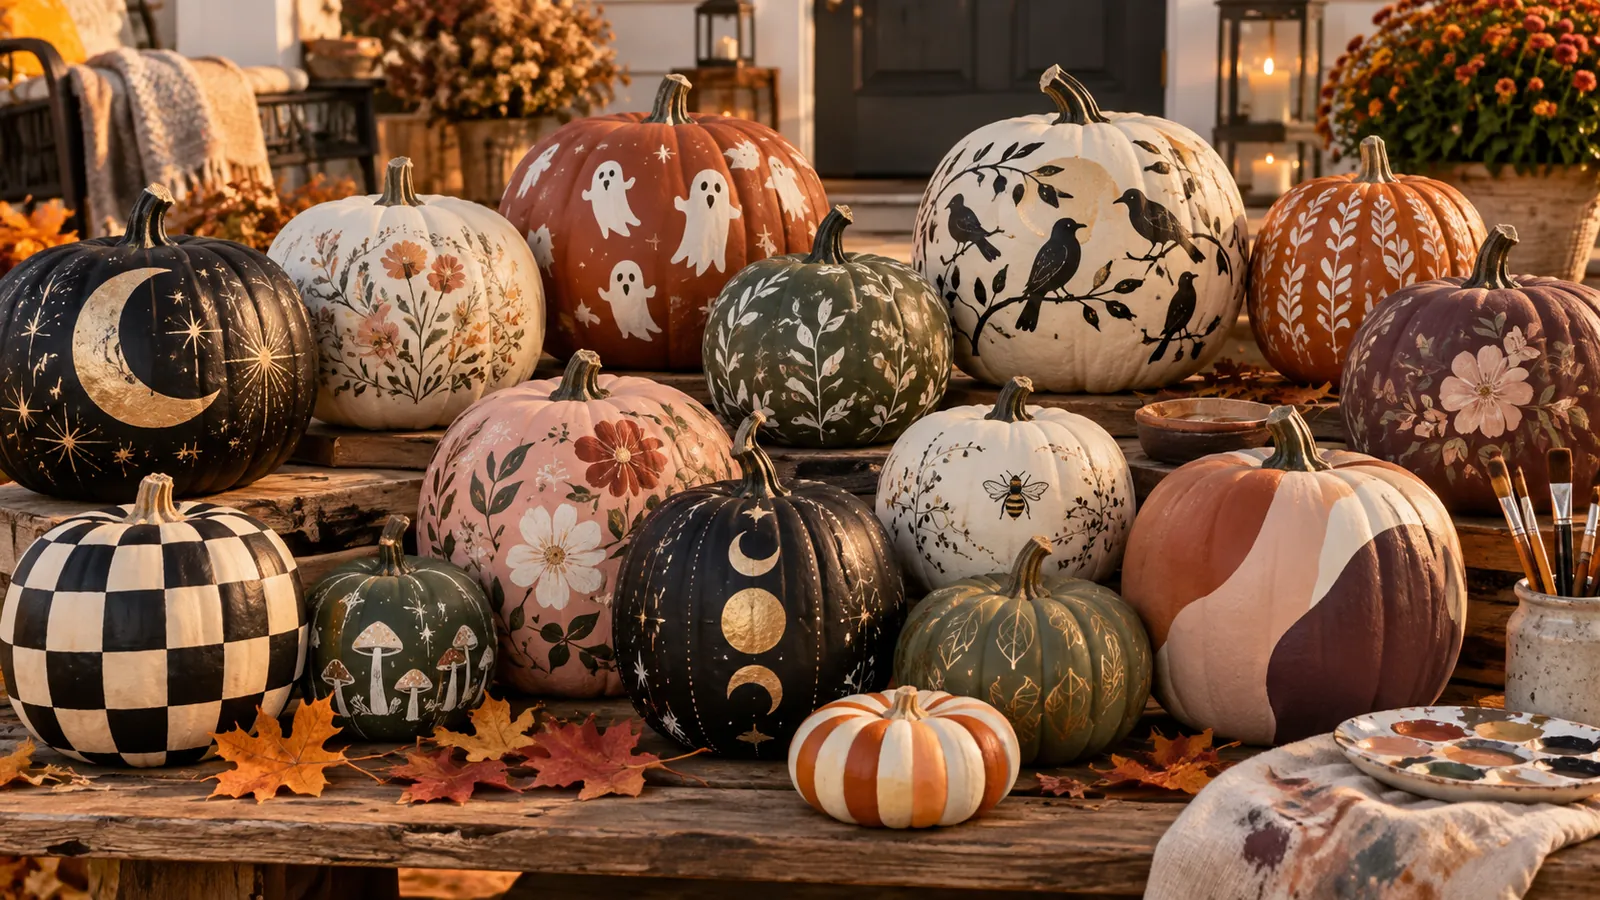
Painted pumpkins deliver the color and personality of Halloween without carving, loose candle flames or a pile of pumpkin pulp. They can be graphic and modern, soft and floral, or distinctly spooky—and the design can follow the shape and natural ribs of the pumpkin instead of fighting them.
This 2026 collection includes 30 original painted pumpkin ideas ranging from fast two-color patterns to detailed botanical and celestial scenes. Every design uses a controlled palette and a repeatable technique, so you can recreate one hero pumpkin or combine several into a coordinated porch, mantel or table display.
Before painting a real pumpkin, wipe away soil with a barely damp cloth and let the surface dry completely. Use products according to their labels, protect the work surface and supervise children. Paint can make composting or animal feeding unsuitable, so check local disposal guidance and never leave painted pumpkins where wildlife may eat them.
For an easy painted pumpkin, choose a smooth dry surface, apply a thin matte base coat and build one simple motif with water-based craft paint. Checkerboards, ghosts, wide color blocks and metallic drips are beginner-friendly; florals, moths and storybook scenes need more drying time. Do not carry a pumpkin by its stem, and keep finished real pumpkins cool and dry.
1. Celestial moon pumpkin
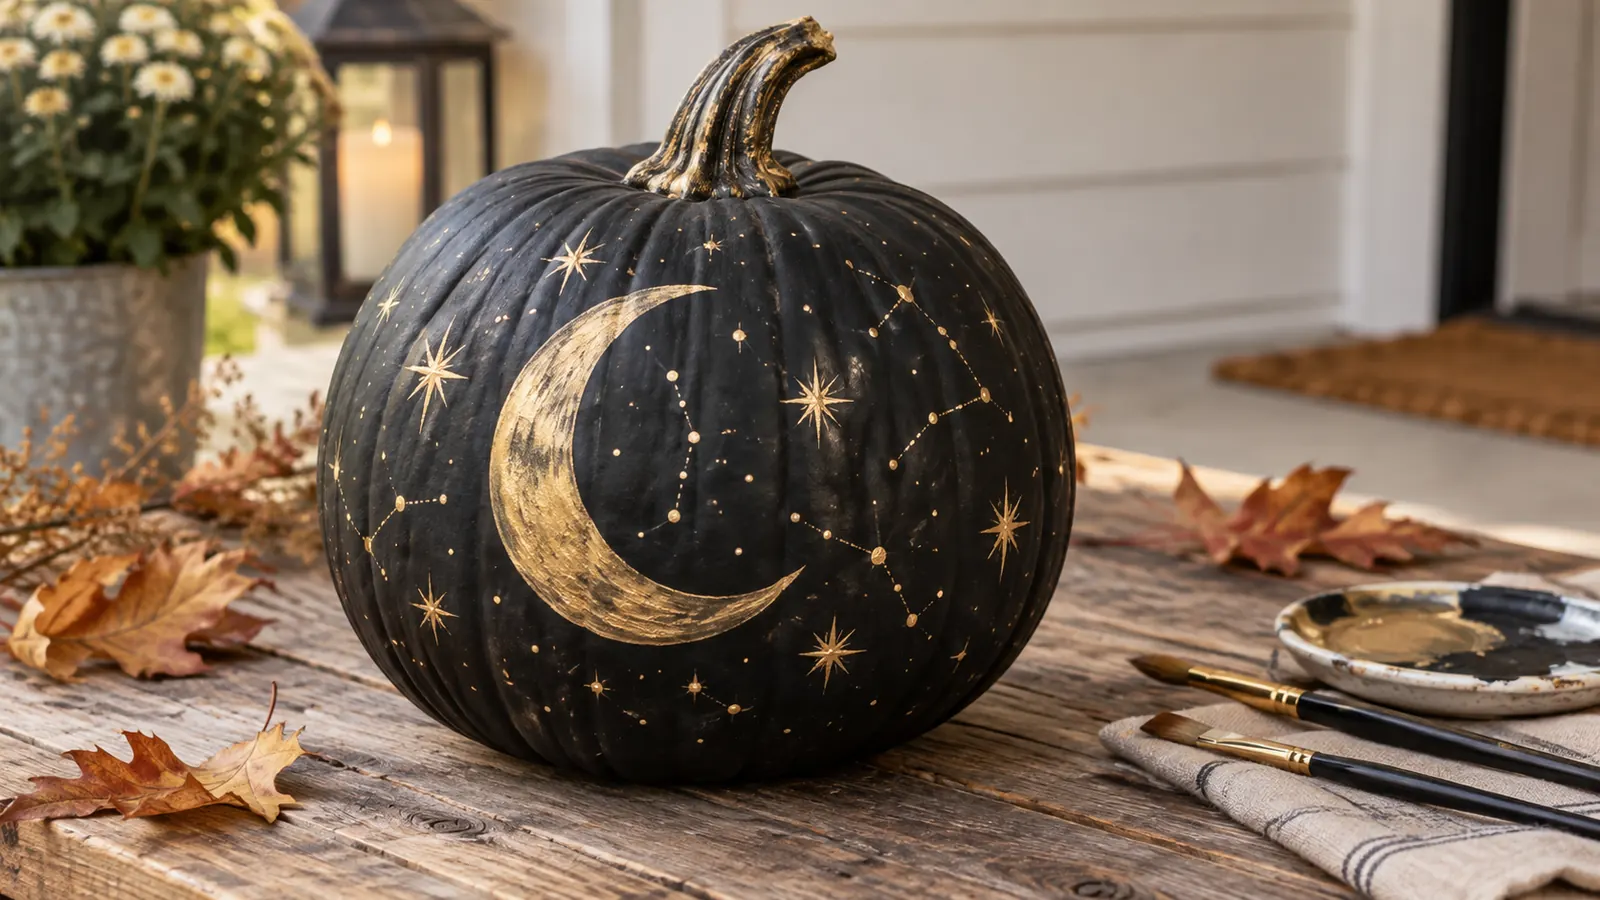
Start with a smooth pumpkin coated in matte black, then add an antique-gold crescent, scattered stars and a few fine constellation lines. The limited black, aged gold and warm ivory palette keeps the finished pumpkin cohesive even when the brushwork remains visibly handmade.
For the clearest result, sketch the crescent in chalk, fill it with a small flat brush and dot the stars with the end of a brush handle. Allow each layer to dry before adding fine details, and rotate the pumpkin on a folded towel instead of holding it by the stem.
Use water-based craft paint according to its label and work on a protected, ventilated surface. A real pumpkin should be clean and fully dry before painting; avoid sealing in moisture around the stem or base, and display it away from direct heat and prolonged rain.
How to paint it
- Wipe the pumpkin clean and let the surface dry completely.
- Apply the base and map the main design in black, aged gold and warm ivory.
- Create the motif: sketch the crescent in chalk, fill it with a small flat brush and dot the stars with the end of a brush handle.
- Let the paint cure, then place the pumpkin where the surface will stay dry and cool.
Best for: A dramatic mantel, porch or Halloween dinner centerpiece
2. Vintage wildflower pumpkin
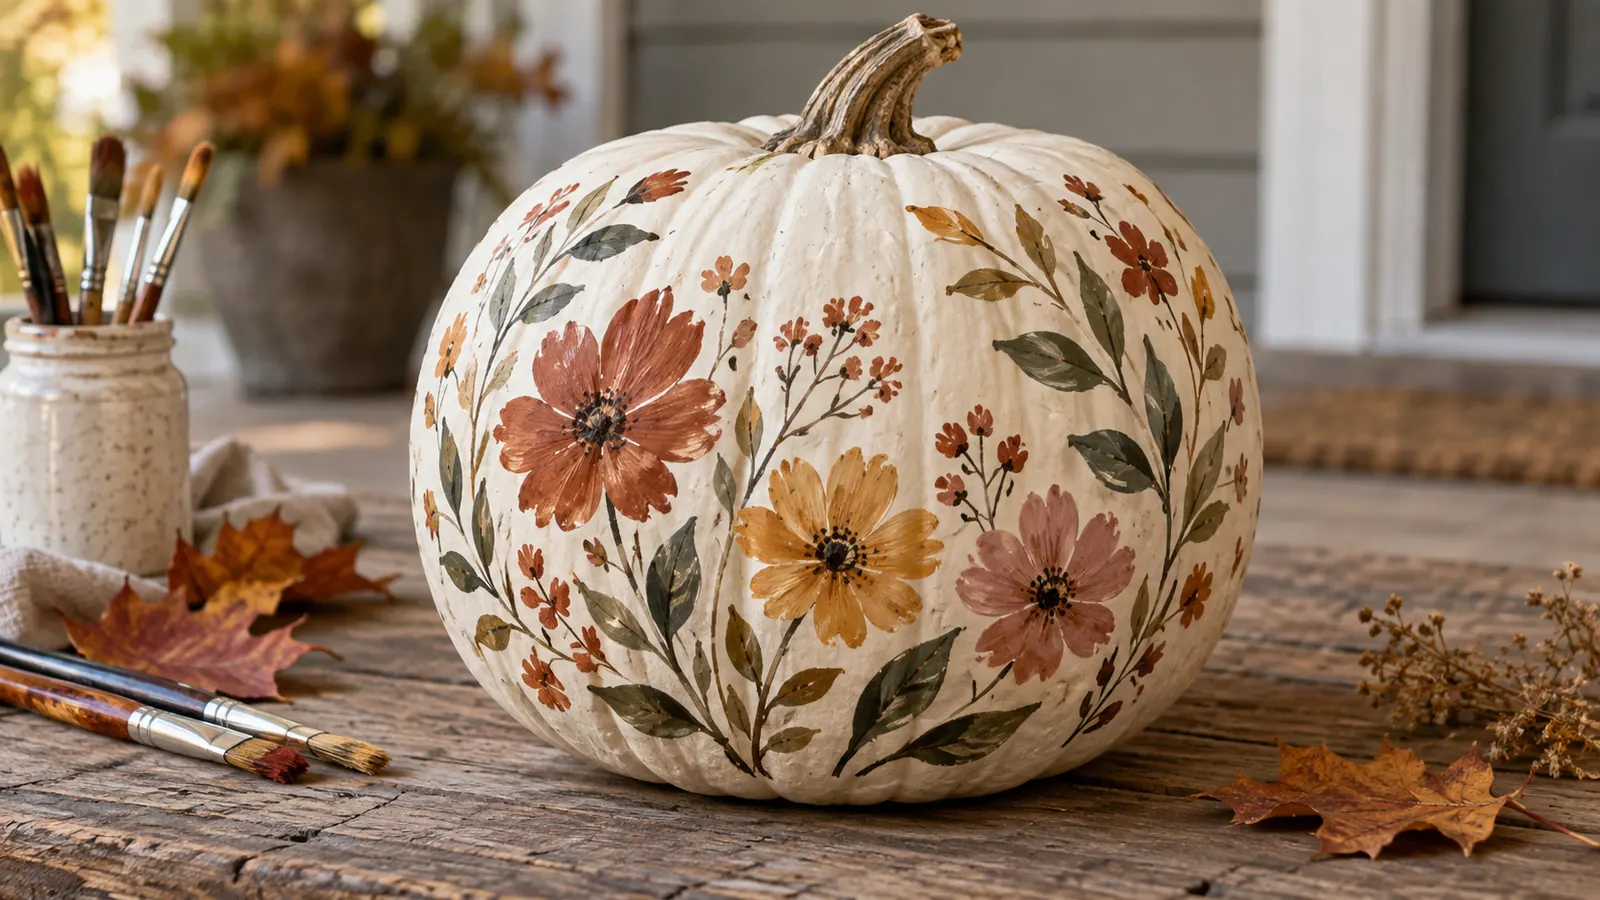
Start with an ivory-painted pumpkin, then add loose rust, ochre and dusty-rose flowers connected by olive stems. The limited ivory, rust, ochre, dusty rose and olive palette keeps the finished pumpkin cohesive even when the brushwork remains visibly handmade.
For the clearest result, paint the largest flowers first, connect them with curved stems and finish with small leaves and seed heads. Allow each layer to dry before adding fine details, and rotate the pumpkin on a folded towel instead of holding it by the stem.
Use water-based craft paint according to its label and work on a protected, ventilated surface. A real pumpkin should be clean and fully dry before painting; avoid sealing in moisture around the stem or base, and display it away from direct heat and prolonged rain.
How to paint it
- Wipe the pumpkin clean and let the surface dry completely.
- Apply the base and map the main design in ivory, rust, ochre, dusty rose and olive.
- Create the motif: paint the largest flowers first, connect them with curved stems and finish with small leaves and seed heads.
- Let the paint cure, then place the pumpkin where the surface will stay dry and cool.
Best for: Romantic, cottage-inspired and early-fall decor
3. Tiny friendly ghost pumpkin
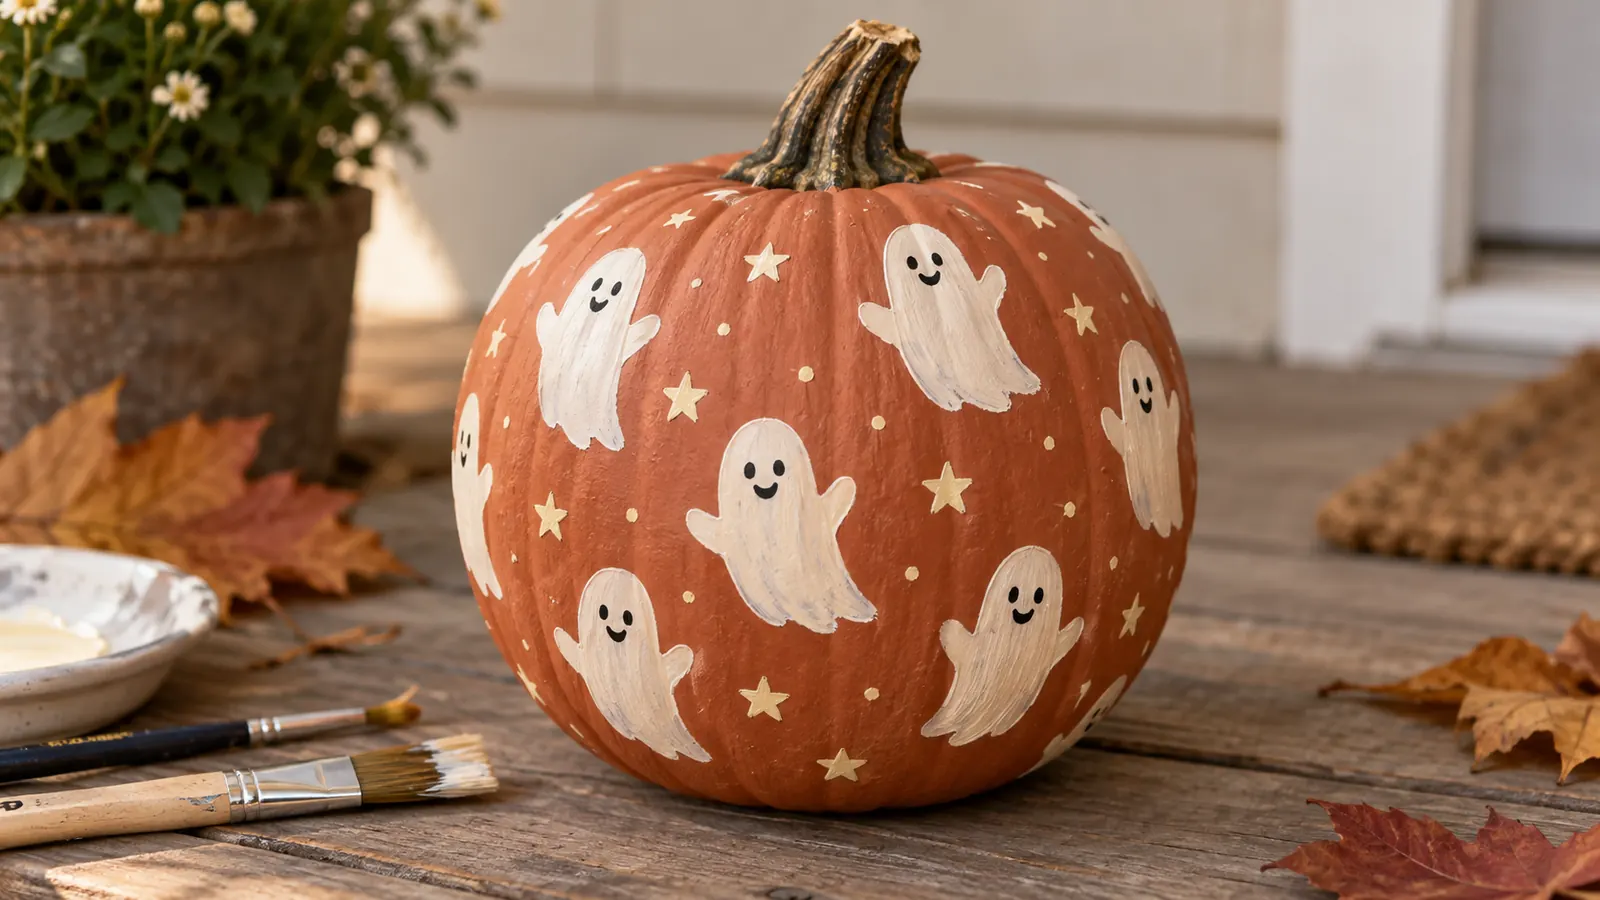
Start with a terracotta pumpkin, then add a repeating family of small ivory ghosts with simple varied poses and tiny stars. The limited terracotta, ivory and muted gold palette keeps the finished pumpkin cohesive even when the brushwork remains visibly handmade.
For the clearest result, block each ghost with two rounded brushstrokes, add the lower curves and place minimal charcoal face details after drying. Allow each layer to dry before adding fine details, and rotate the pumpkin on a folded towel instead of holding it by the stem.
Use water-based craft paint according to its label and work on a protected, ventilated surface. A real pumpkin should be clean and fully dry before painting; avoid sealing in moisture around the stem or base, and display it away from direct heat and prolonged rain.
How to paint it
- Wipe the pumpkin clean and let the surface dry completely.
- Apply the base and map the main design in terracotta, ivory and muted gold.
- Create the motif: block each ghost with two rounded brushstrokes, add the lower curves and place minimal charcoal face details after drying.
- Let the paint cure, then place the pumpkin where the surface will stay dry and cool.
Best for: Cute family-friendly Halloween decorating
4. Modern checkerboard pumpkin
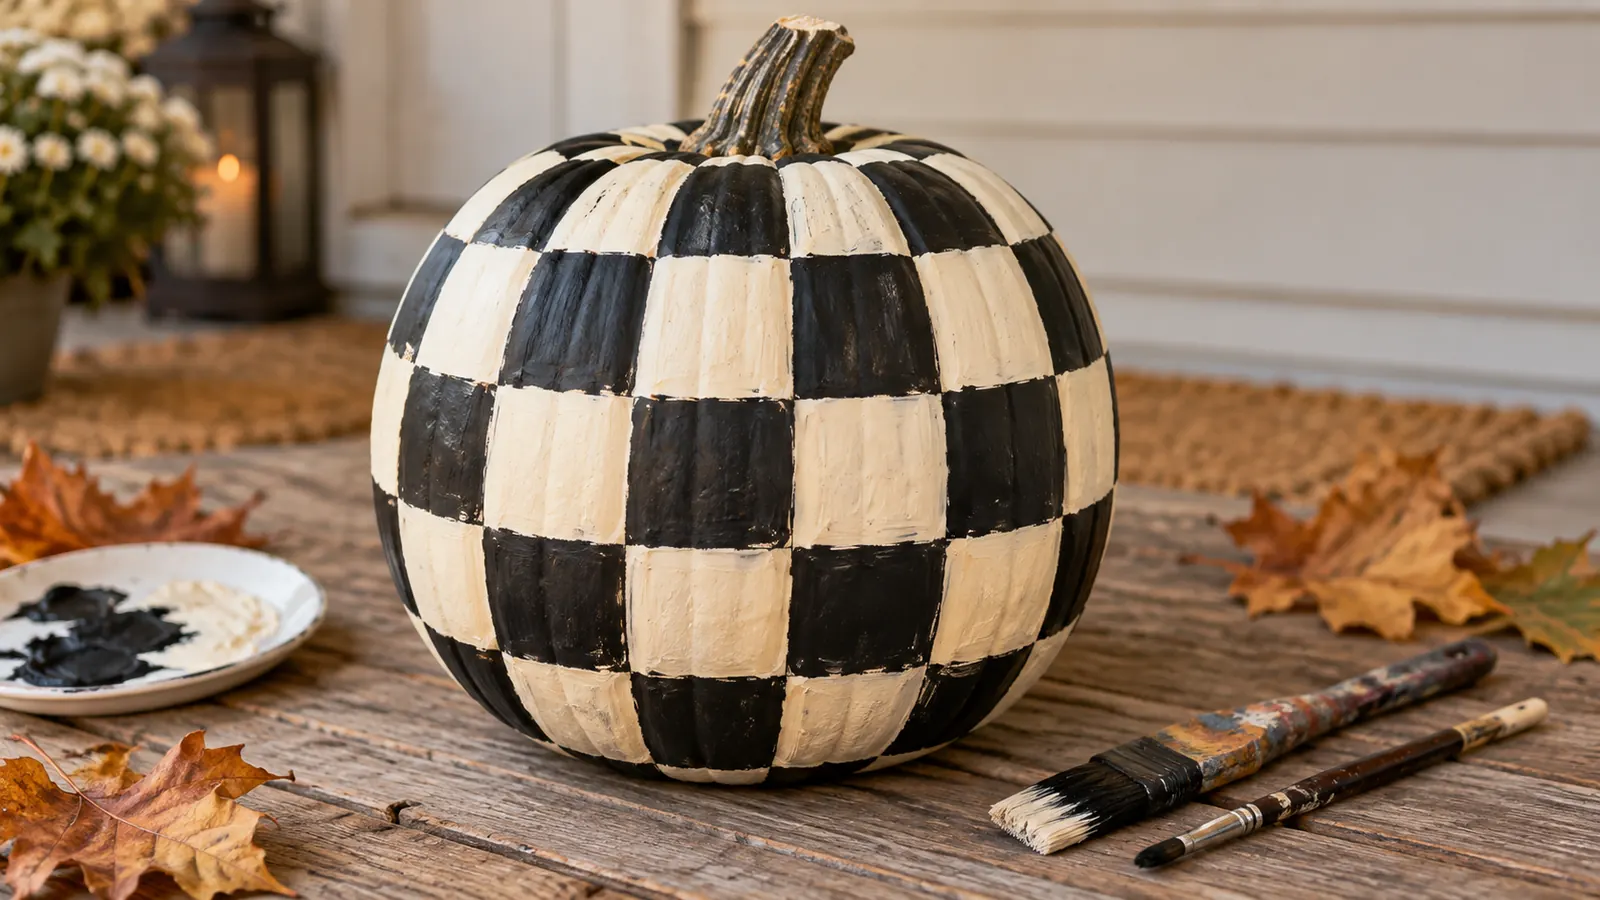
Start with a round pumpkin primed in warm ivory, then add an intentionally imperfect black checkerboard that follows the pumpkin's ribs. The limited warm ivory and matte black palette keeps the finished pumpkin cohesive even when the brushwork remains visibly handmade.
For the clearest result, use the natural grooves as vertical guides, mark horizontal divisions lightly and paint alternating blocks freehand. Allow each layer to dry before adding fine details, and rotate the pumpkin on a folded towel instead of holding it by the stem.
Use water-based craft paint according to its label and work on a protected, ventilated surface. A real pumpkin should be clean and fully dry before painting; avoid sealing in moisture around the stem or base, and display it away from direct heat and prolonged rain.
How to paint it
- Wipe the pumpkin clean and let the surface dry completely.
- Apply the base and map the main design in warm ivory and matte black.
- Create the motif: use the natural grooves as vertical guides, mark horizontal divisions lightly and paint alternating blocks freehand.
- Let the paint cure, then place the pumpkin where the surface will stay dry and cool.
Best for: Graphic modern interiors and a quick high-impact project
5. Woodland mushroom pumpkin
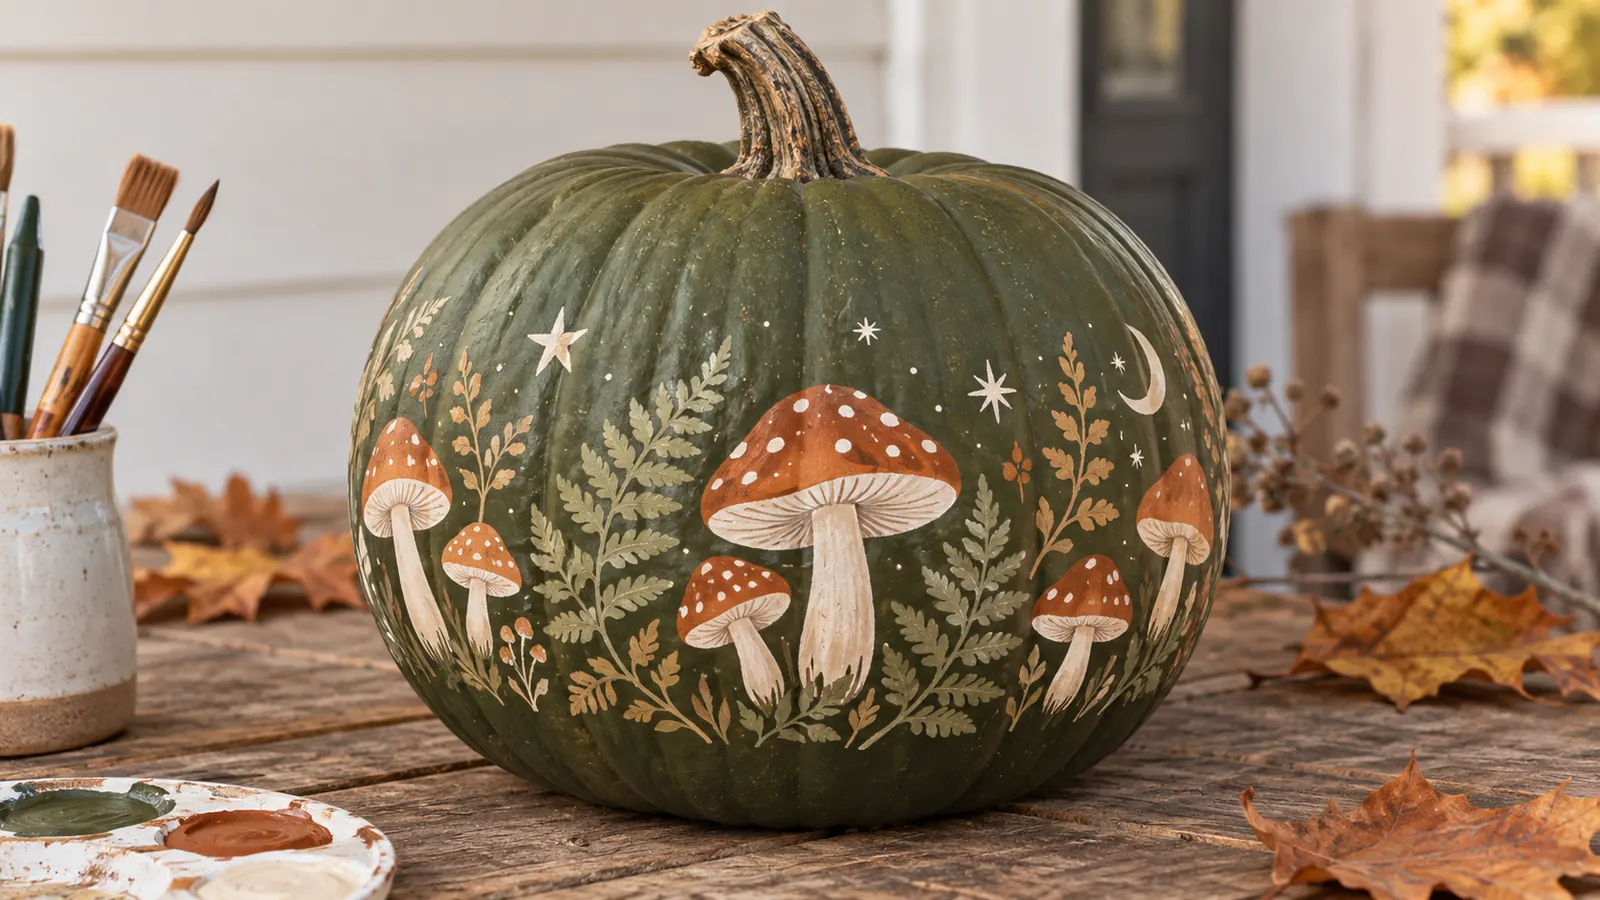
Start with a moss-green pumpkin, then add a low ring of rust and cream mushrooms mixed with ferns and tiny stars. The limited moss, cream, rust and pale gold palette keeps the finished pumpkin cohesive even when the brushwork remains visibly handmade.
For the clearest result, paint mushroom caps at different heights, add narrow stems and fill the spaces with fine fern fronds. Allow each layer to dry before adding fine details, and rotate the pumpkin on a folded towel instead of holding it by the stem.
Use water-based craft paint according to its label and work on a protected, ventilated surface. A real pumpkin should be clean and fully dry before painting; avoid sealing in moisture around the stem or base, and display it away from direct heat and prolonged rain.
How to paint it
- Wipe the pumpkin clean and let the surface dry completely.
- Apply the base and map the main design in moss, cream, rust and pale gold.
- Create the motif: paint mushroom caps at different heights, add narrow stems and fill the spaces with fine fern fronds.
- Let the paint cure, then place the pumpkin where the surface will stay dry and cool.
Best for: Woodland, cottage and nature-inspired displays
6. Folk-art bird pumpkin
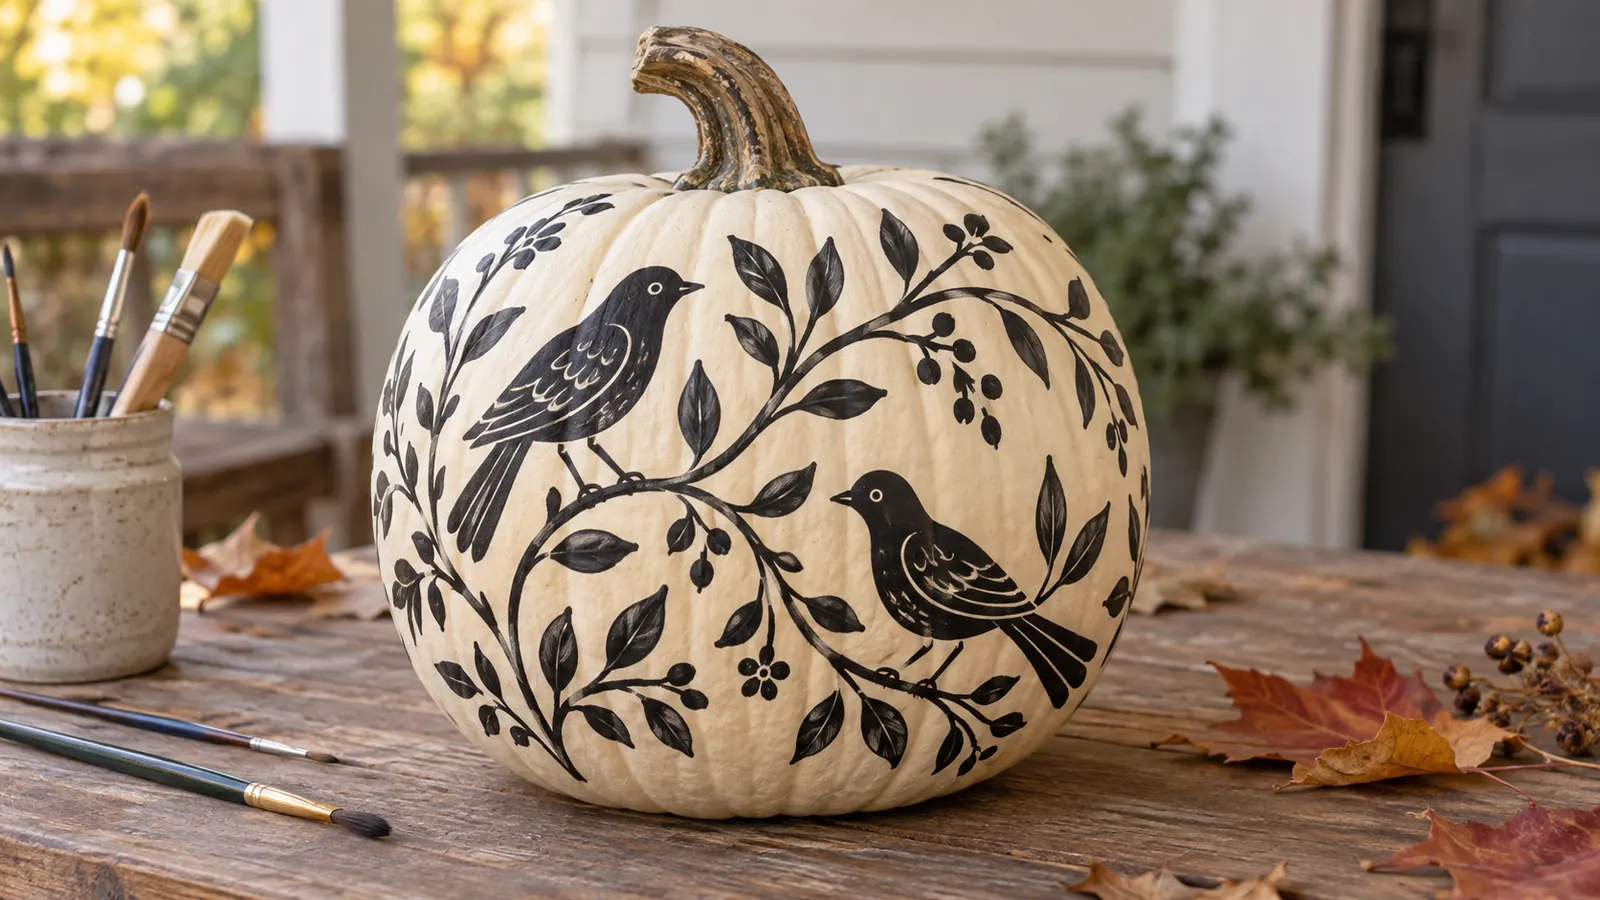
Start with a matte ivory pumpkin, then add original black birds perched inside symmetrical curling branches. The limited ivory, charcoal and a touch of ochre palette keeps the finished pumpkin cohesive even when the brushwork remains visibly handmade.
For the clearest result, draw a center guideline, mirror the main branches loosely and add birds as simple teardrop bodies with curved wings. Allow each layer to dry before adding fine details, and rotate the pumpkin on a folded towel instead of holding it by the stem.
Use water-based craft paint according to its label and work on a protected, ventilated surface. A real pumpkin should be clean and fully dry before painting; avoid sealing in moisture around the stem or base, and display it away from direct heat and prolonged rain.
How to paint it
- Wipe the pumpkin clean and let the surface dry completely.
- Apply the base and map the main design in ivory, charcoal and a touch of ochre.
- Create the motif: draw a center guideline, mirror the main branches loosely and add birds as simple teardrop bodies with curved wings.
- Let the paint cure, then place the pumpkin where the surface will stay dry and cool.
Best for: A sophisticated black-and-white entryway
7. Color-block wave pumpkin
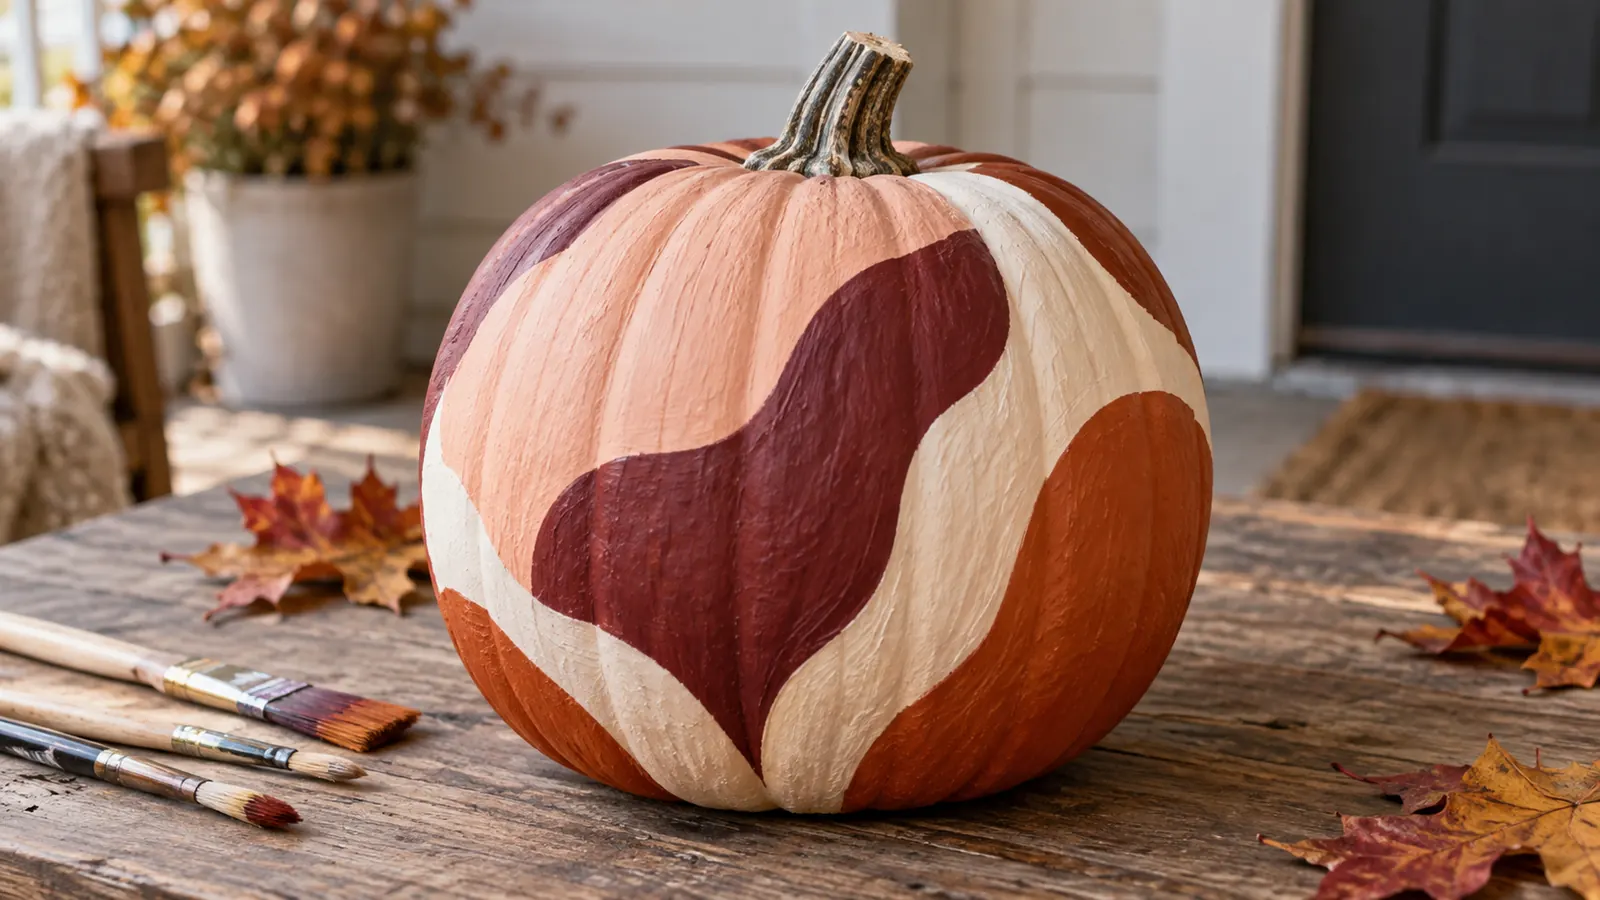
Start with a pale peach pumpkin, then add wide organic waves wrapping around the surface without a strict repeat. The limited dusty peach, burgundy, cream and rust palette keeps the finished pumpkin cohesive even when the brushwork remains visibly handmade.
For the clearest result, draw three flowing boundaries around the pumpkin and fill each band with two thin coats. Allow each layer to dry before adding fine details, and rotate the pumpkin on a folded towel instead of holding it by the stem.
Use water-based craft paint according to its label and work on a protected, ventilated surface. A real pumpkin should be clean and fully dry before painting; avoid sealing in moisture around the stem or base, and display it away from direct heat and prolonged rain.
How to paint it
- Wipe the pumpkin clean and let the surface dry completely.
- Apply the base and map the main design in dusty peach, burgundy, cream and rust.
- Create the motif: draw three flowing boundaries around the pumpkin and fill each band with two thin coats.
- Let the paint cure, then place the pumpkin where the surface will stay dry and cool.
Best for: Contemporary homes and painters who prefer bold shapes
8. Midnight moth pumpkin
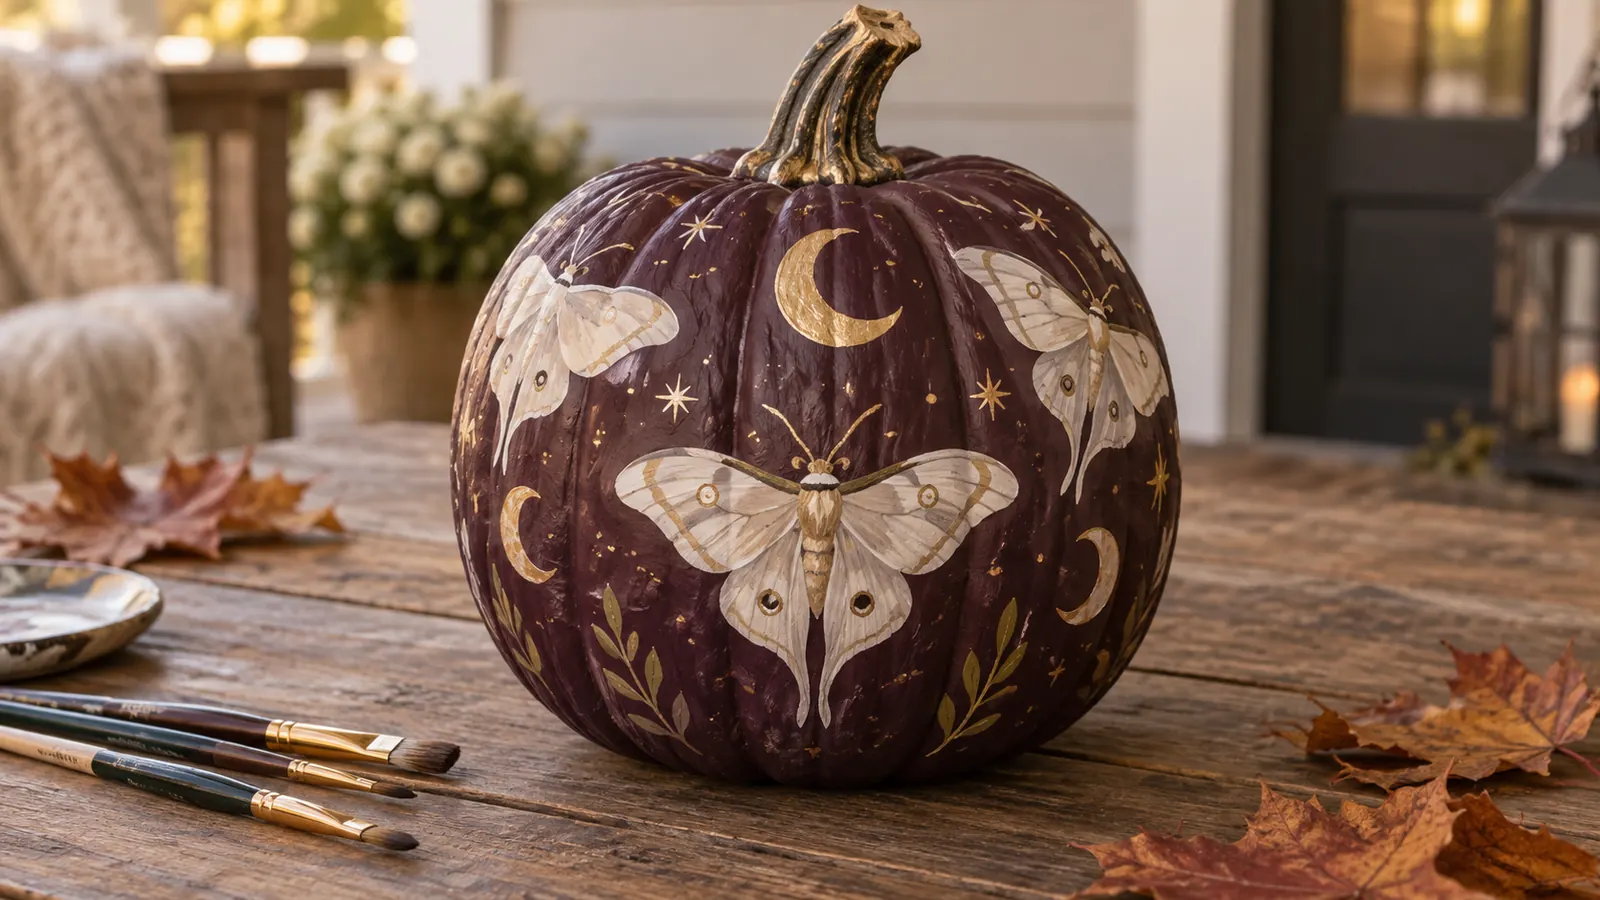
Start with a deep plum pumpkin, then add pale symmetrical moths surrounded by crescent moons and restrained gold dots. The limited plum, parchment and antique gold palette keeps the finished pumpkin cohesive even when the brushwork remains visibly handmade.
For the clearest result, make one folded-paper moth template, trace it at different angles and vary the wing markings by hand. Allow each layer to dry before adding fine details, and rotate the pumpkin on a folded towel instead of holding it by the stem.
Use water-based craft paint according to its label and work on a protected, ventilated surface. A real pumpkin should be clean and fully dry before painting; avoid sealing in moisture around the stem or base, and display it away from direct heat and prolonged rain.
How to paint it
- Wipe the pumpkin clean and let the surface dry completely.
- Apply the base and map the main design in plum, parchment and antique gold.
- Create the motif: make one folded-paper moth template, trace it at different angles and vary the wing markings by hand.
- Let the paint cure, then place the pumpkin where the surface will stay dry and cool.
Best for: Moody shelves, sideboards and celestial Halloween themes
9. Blue botanical pumpkin
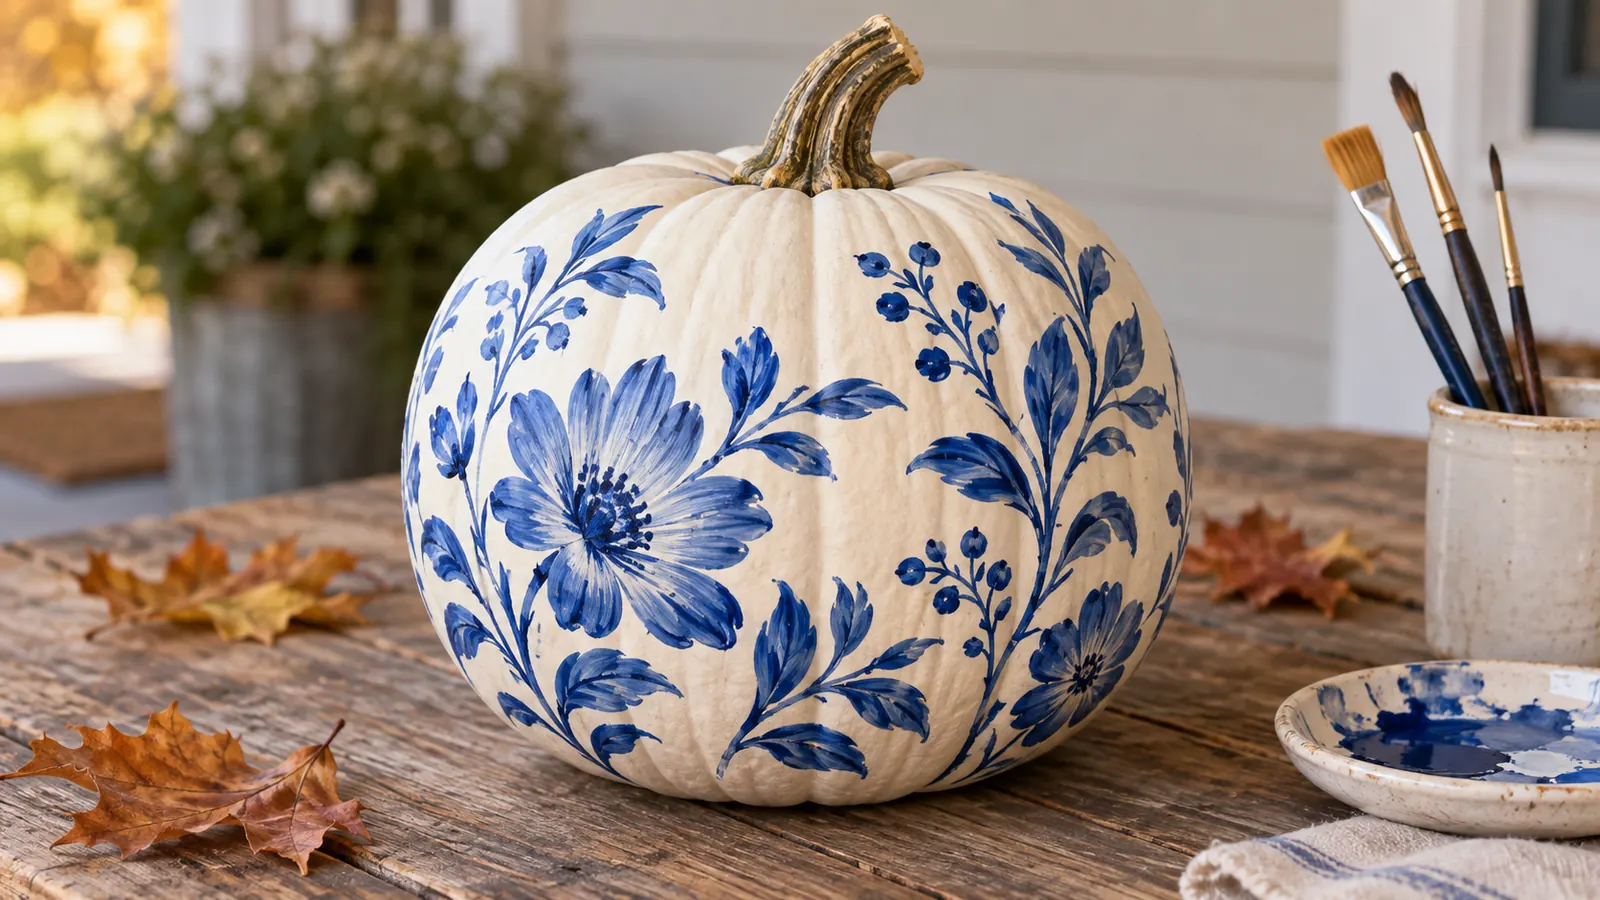
Start with an ivory pumpkin, then add original cobalt flowers, leaves and curling stems inspired by hand-painted ceramics. The limited ivory and cobalt blue palette keeps the finished pumpkin cohesive even when the brushwork remains visibly handmade.
For the clearest result, use a round brush with varied pressure to form leaves in one stroke and keep generous white space between clusters. Allow each layer to dry before adding fine details, and rotate the pumpkin on a folded towel instead of holding it by the stem.
Use water-based craft paint according to its label and work on a protected, ventilated surface. A real pumpkin should be clean and fully dry before painting; avoid sealing in moisture around the stem or base, and display it away from direct heat and prolonged rain.
How to paint it
- Wipe the pumpkin clean and let the surface dry completely.
- Apply the base and map the main design in ivory and cobalt blue.
- Create the motif: use a round brush with varied pressure to form leaves in one stroke and keep generous white space between clusters.
- Let the paint cure, then place the pumpkin where the surface will stay dry and cool.
Best for: Blue-and-white rooms and Halloween decor that does not rely on orange
10. Gold leaf-line pumpkin
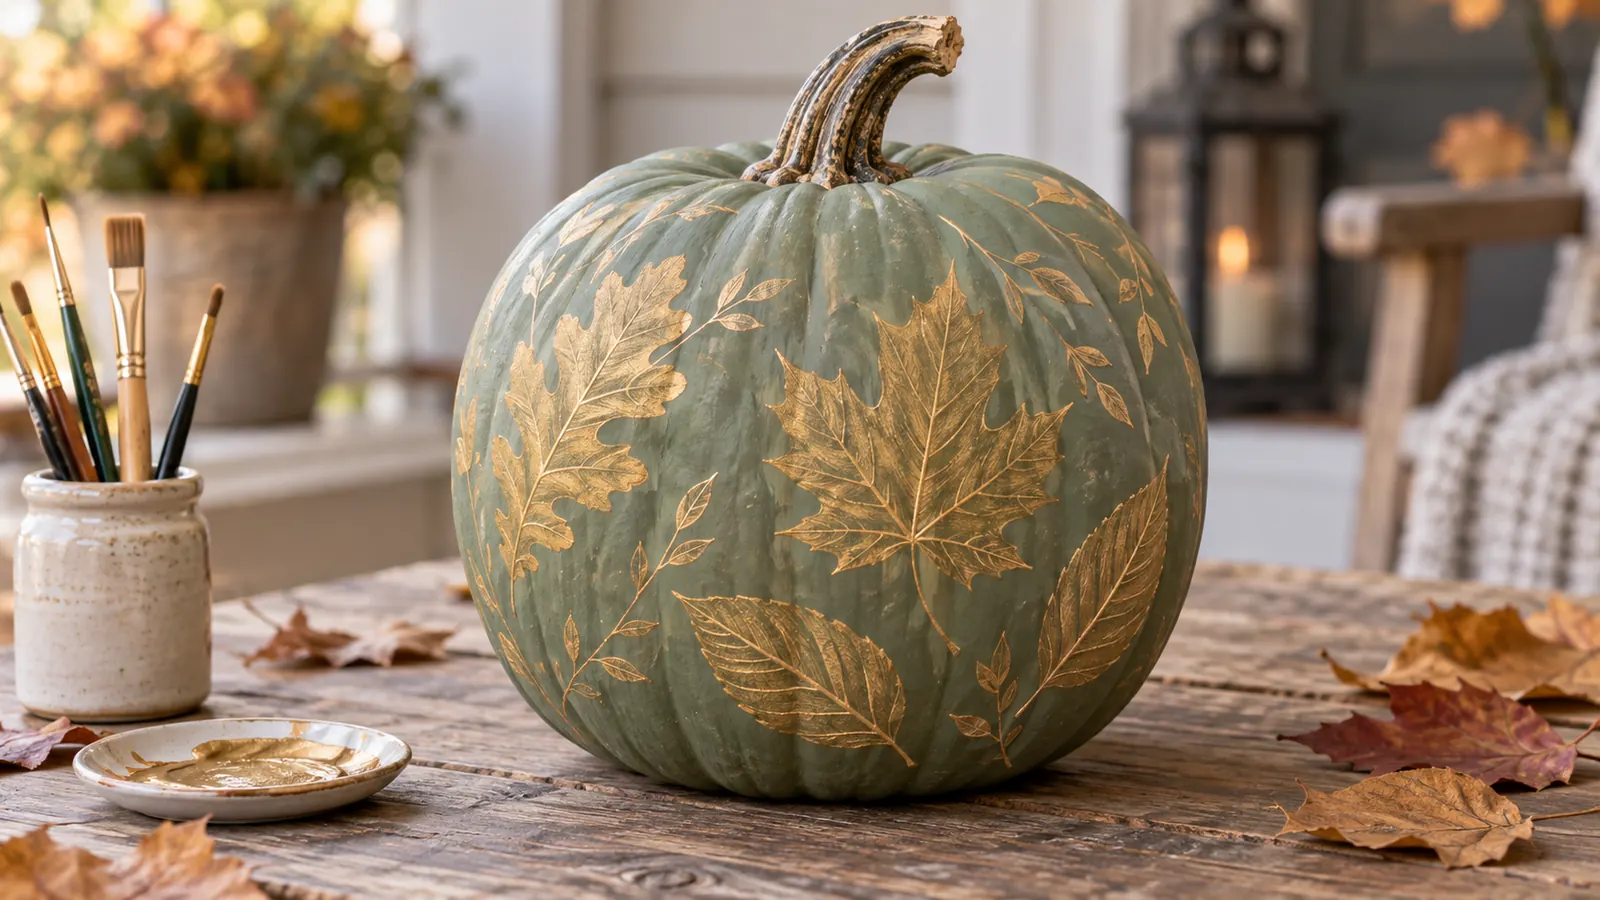
Start with a muted sage pumpkin, then add fine outlines of oak, maple and beech leaves following the natural ribs. The limited sage and antique gold palette keeps the finished pumpkin cohesive even when the brushwork remains visibly handmade.
For the clearest result, draw each leaf with a fine paint marker made for craft surfaces, then add a few hand-painted metallic accents. Allow each layer to dry before adding fine details, and rotate the pumpkin on a folded towel instead of holding it by the stem.
Use water-based craft paint according to its label and work on a protected, ventilated surface. A real pumpkin should be clean and fully dry before painting; avoid sealing in moisture around the stem or base, and display it away from direct heat and prolonged rain.
How to paint it
- Wipe the pumpkin clean and let the surface dry completely.
- Apply the base and map the main design in sage and antique gold.
- Create the motif: draw each leaf with a fine paint marker made for craft surfaces, then add a few hand-painted metallic accents.
- Let the paint cure, then place the pumpkin where the surface will stay dry and cool.
Best for: Minimalist autumn decor that can remain after Halloween
11. Moonlit cat silhouette pumpkin
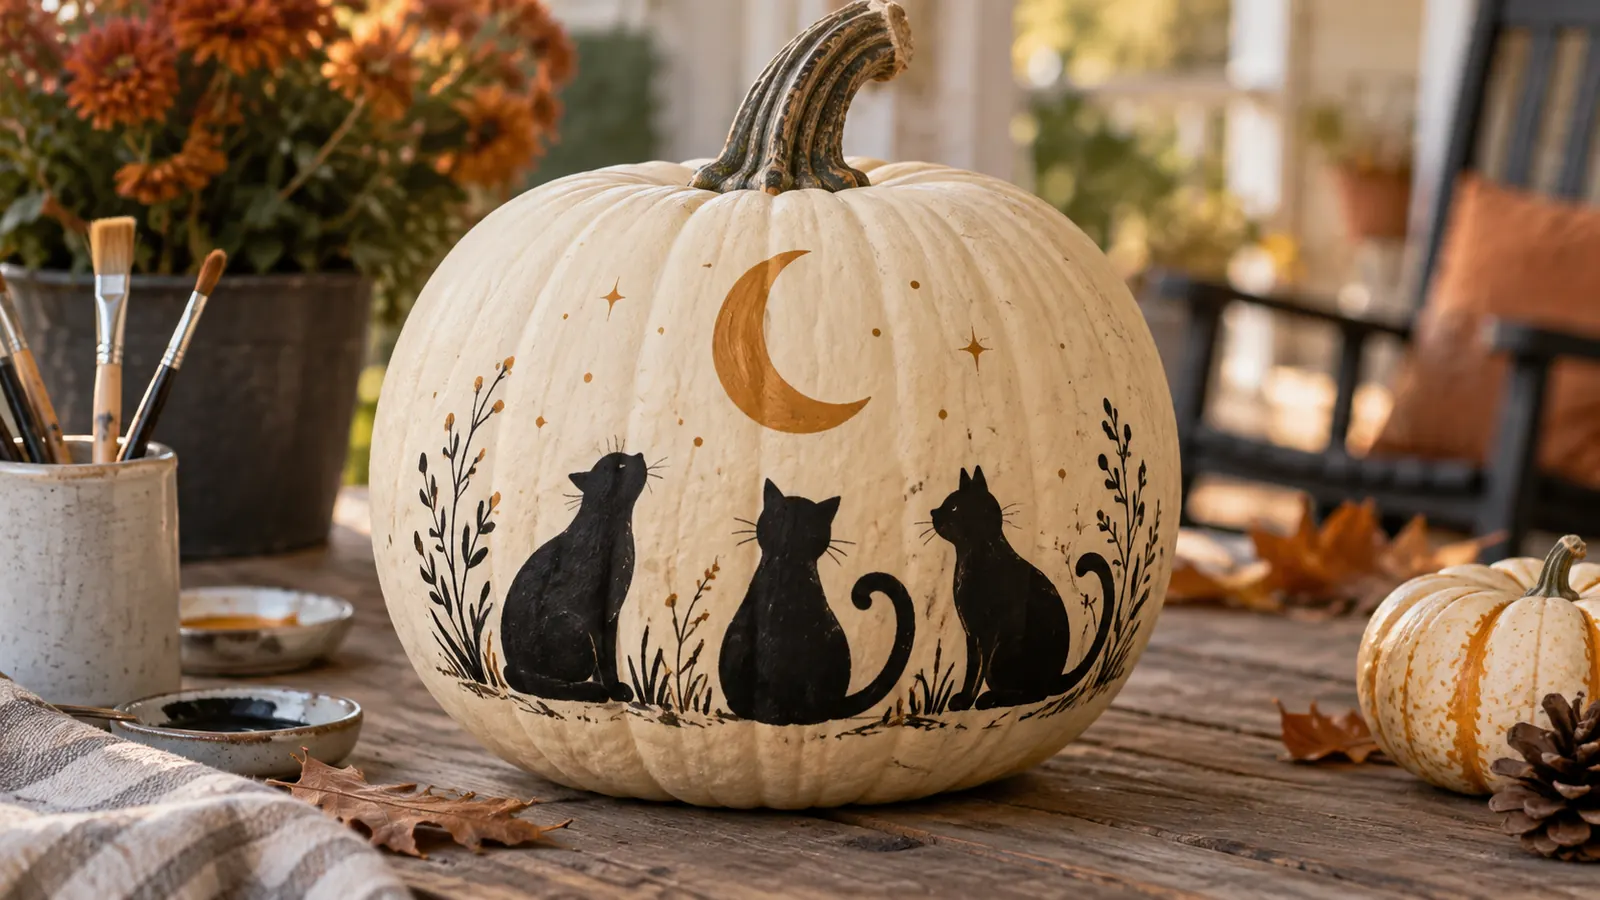
Start with a warm cream pumpkin, then add three original black cat silhouettes sitting beneath a thin ochre moon. The limited cream, black and ochre palette keeps the finished pumpkin cohesive even when the brushwork remains visibly handmade.
For the clearest result, paint the moon first, then build each cat from a seated oval, curved back, ears and a different tail shape. Allow each layer to dry before adding fine details, and rotate the pumpkin on a folded towel instead of holding it by the stem.
Use water-based craft paint according to its label and work on a protected, ventilated surface. A real pumpkin should be clean and fully dry before painting; avoid sealing in moisture around the stem or base, and display it away from direct heat and prolonged rain.
How to paint it
- Wipe the pumpkin clean and let the surface dry completely.
- Apply the base and map the main design in cream, black and ochre.
- Create the motif: paint the moon first, then build each cat from a seated oval, curved back, ears and a different tail shape.
- Let the paint cure, then place the pumpkin where the surface will stay dry and cool.
Best for: Cat lovers and a playful windowsill display
12. Burgundy dahlia pumpkin
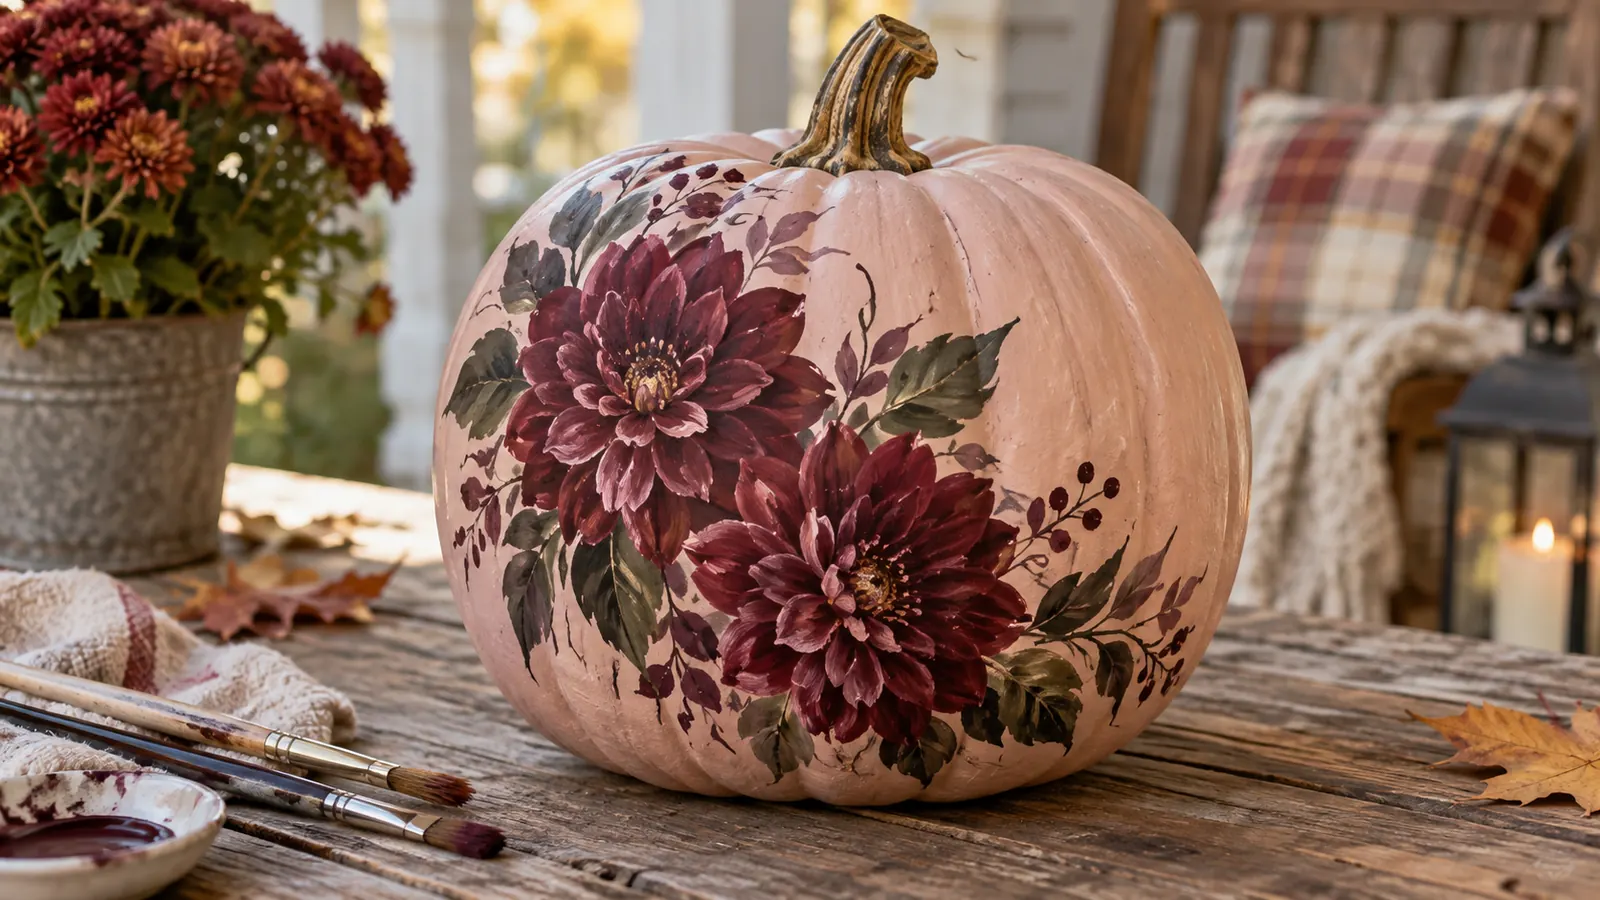
Start with a dusty blush pumpkin, then add two large layered dahlias with dark leaves wrapping one side. The limited blush, burgundy, plum and muted olive palette keeps the finished pumpkin cohesive even when the brushwork remains visibly handmade.
For the clearest result, build petals from the center outward with short tapered strokes and deepen only the inner shadows. Allow each layer to dry before adding fine details, and rotate the pumpkin on a folded towel instead of holding it by the stem.
Use water-based craft paint according to its label and work on a protected, ventilated surface. A real pumpkin should be clean and fully dry before painting; avoid sealing in moisture around the stem or base, and display it away from direct heat and prolonged rain.
How to paint it
- Wipe the pumpkin clean and let the surface dry completely.
- Apply the base and map the main design in blush, burgundy, plum and muted olive.
- Create the motif: build petals from the center outward with short tapered strokes and deepen only the inner shadows.
- Let the paint cure, then place the pumpkin where the surface will stay dry and cool.
Best for: Elegant dining tables and floral fall styling
13. Scalloped stripe pumpkin
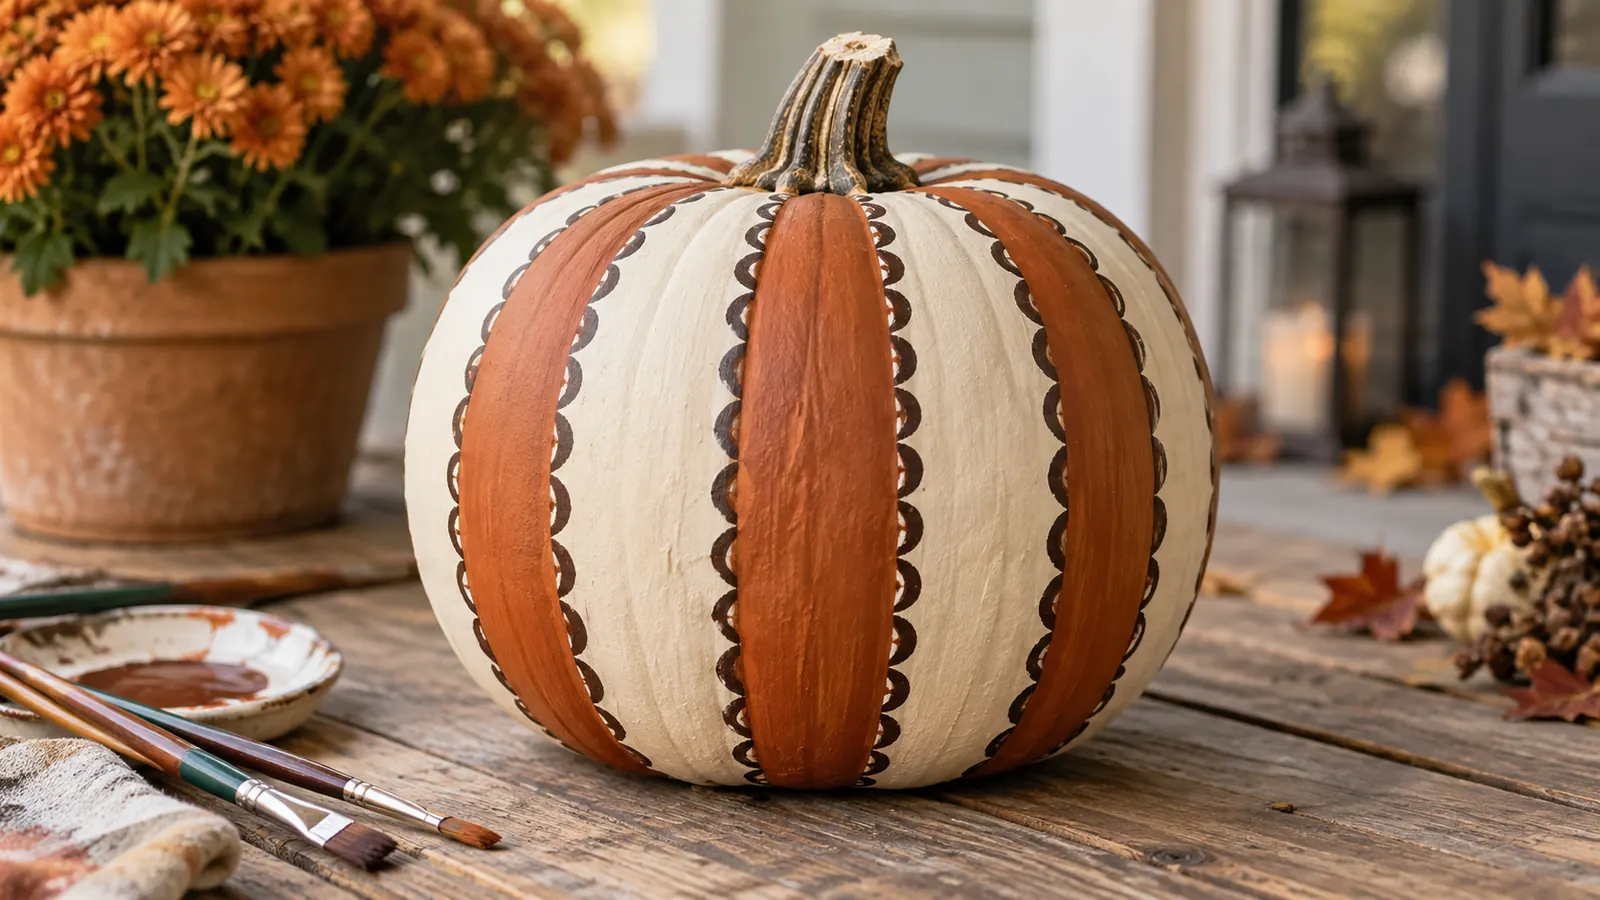
Start with an ivory pumpkin, then add alternating rust stripes edged with a small hand-painted scallop. The limited ivory, rust and dark brown palette keeps the finished pumpkin cohesive even when the brushwork remains visibly handmade.
For the clearest result, use each rib as one stripe, paint every other section and add scallops along one edge with a round brush. Allow each layer to dry before adding fine details, and rotate the pumpkin on a folded towel instead of holding it by the stem.
Use water-based craft paint according to its label and work on a protected, ventilated surface. A real pumpkin should be clean and fully dry before painting; avoid sealing in moisture around the stem or base, and display it away from direct heat and prolonged rain.
How to paint it
- Wipe the pumpkin clean and let the surface dry completely.
- Apply the base and map the main design in ivory, rust and dark brown.
- Create the motif: use each rib as one stripe, paint every other section and add scallops along one edge with a round brush.
- Let the paint cure, then place the pumpkin where the surface will stay dry and cool.
Best for: Beginners who want a structured pattern without measuring a grid
14. Golden bee pumpkin
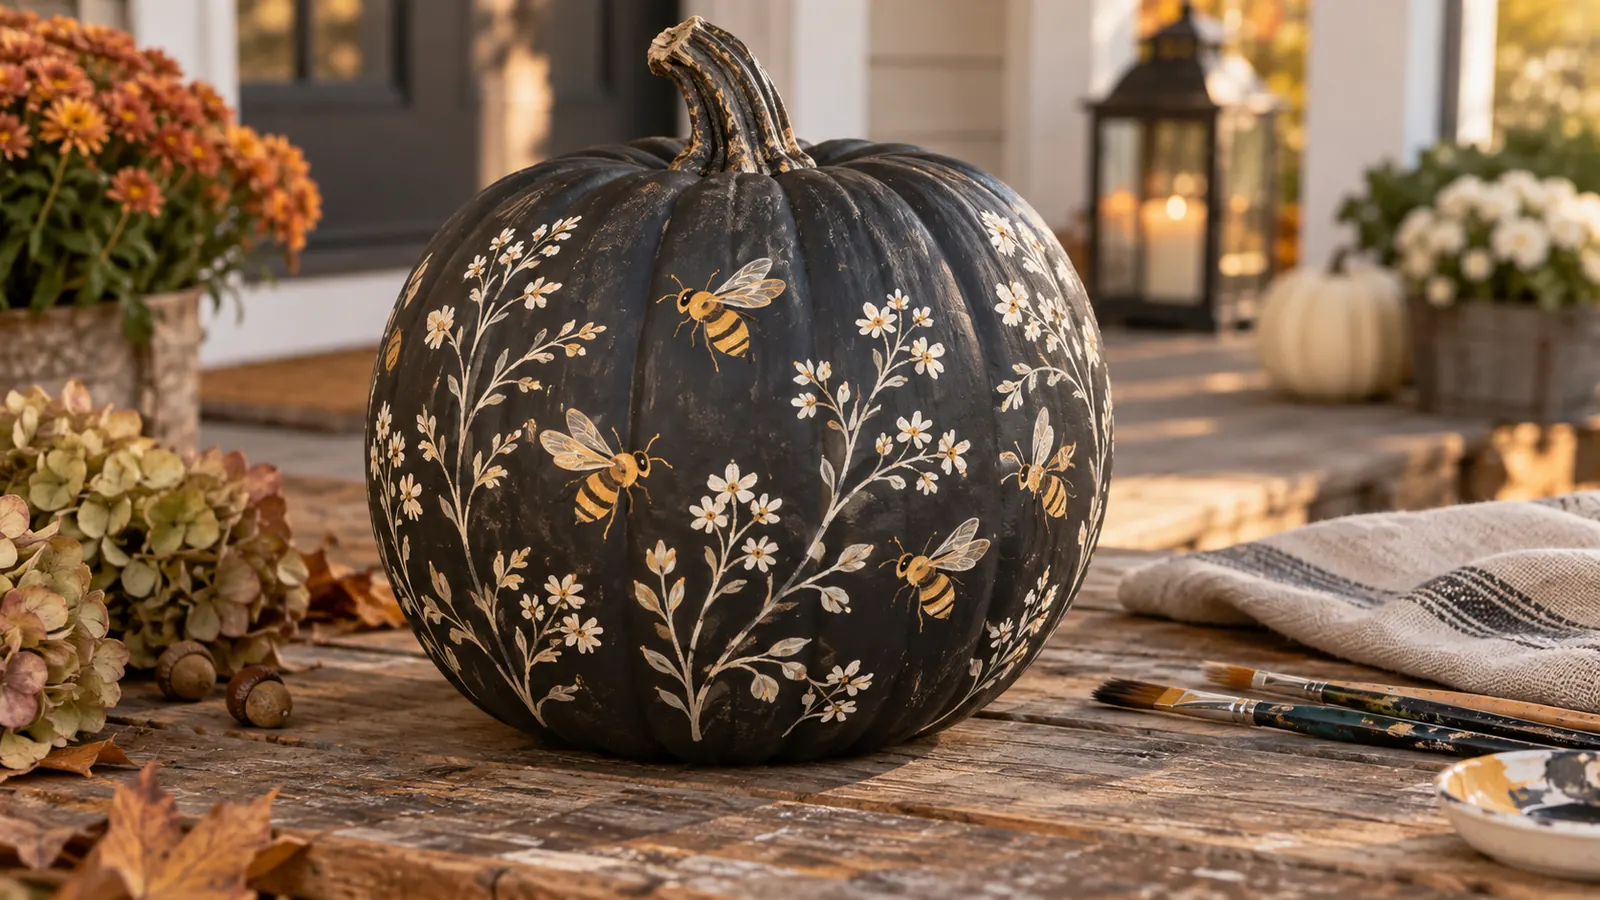
Start with a charcoal pumpkin, then add small original golden bees moving through delicate ivory botanical sprigs. The limited charcoal, honey gold and ivory palette keeps the finished pumpkin cohesive even when the brushwork remains visibly handmade.
For the clearest result, dot oval bodies first, add short stripes and translucent-looking wings with thin curved strokes. Allow each layer to dry before adding fine details, and rotate the pumpkin on a folded towel instead of holding it by the stem.
Use water-based craft paint according to its label and work on a protected, ventilated surface. A real pumpkin should be clean and fully dry before painting; avoid sealing in moisture around the stem or base, and display it away from direct heat and prolonged rain.
How to paint it
- Wipe the pumpkin clean and let the surface dry completely.
- Apply the base and map the main design in charcoal, honey gold and ivory.
- Create the motif: dot oval bodies first, add short stripes and translucent-looking wings with thin curved strokes.
- Let the paint cure, then place the pumpkin where the surface will stay dry and cool.
Best for: Garden-inspired Halloween decor and small pumpkins
15. Retro daisy pumpkin
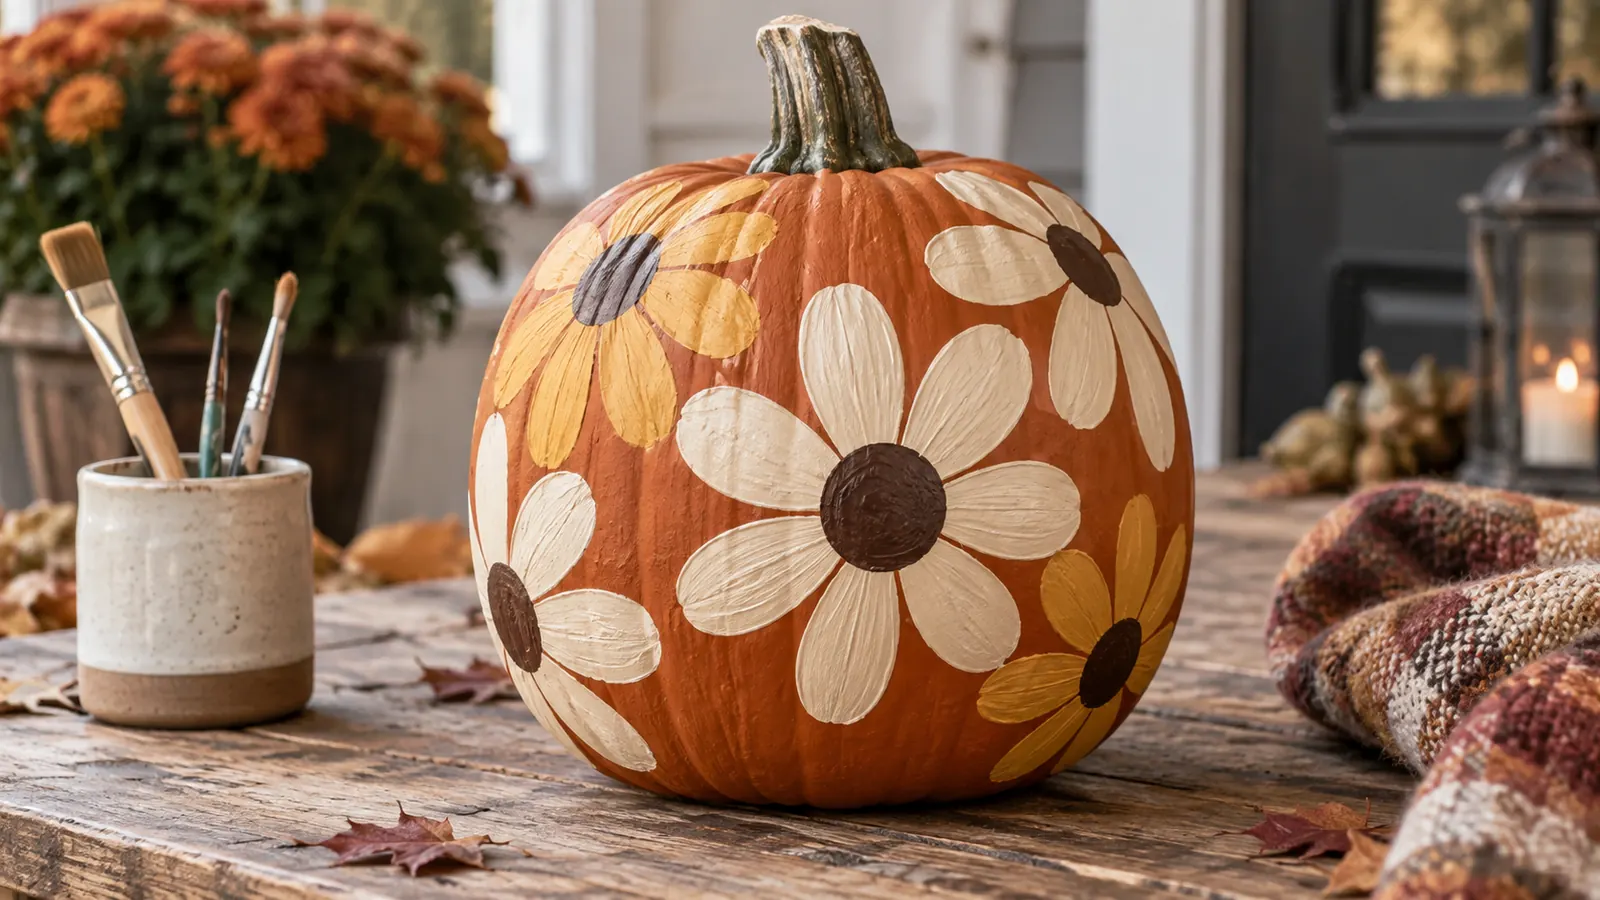
Start with a burnt-orange pumpkin, then add oversized cream and mustard daisies with chunky dark centers. The limited burnt orange, cream, mustard and espresso palette keeps the finished pumpkin cohesive even when the brushwork remains visibly handmade.
For the clearest result, space the flower centers first and pull broad rounded petals outward with a flat brush. Allow each layer to dry before adding fine details, and rotate the pumpkin on a folded towel instead of holding it by the stem.
Use water-based craft paint according to its label and work on a protected, ventilated surface. A real pumpkin should be clean and fully dry before painting; avoid sealing in moisture around the stem or base, and display it away from direct heat and prolonged rain.
How to paint it
- Wipe the pumpkin clean and let the surface dry completely.
- Apply the base and map the main design in burnt orange, cream, mustard and espresso.
- Create the motif: space the flower centers first and pull broad rounded petals outward with a flat brush.
- Let the paint cure, then place the pumpkin where the surface will stay dry and cool.
Best for: Cheerful retro interiors and a simple family craft
16. Minimal expression pumpkins
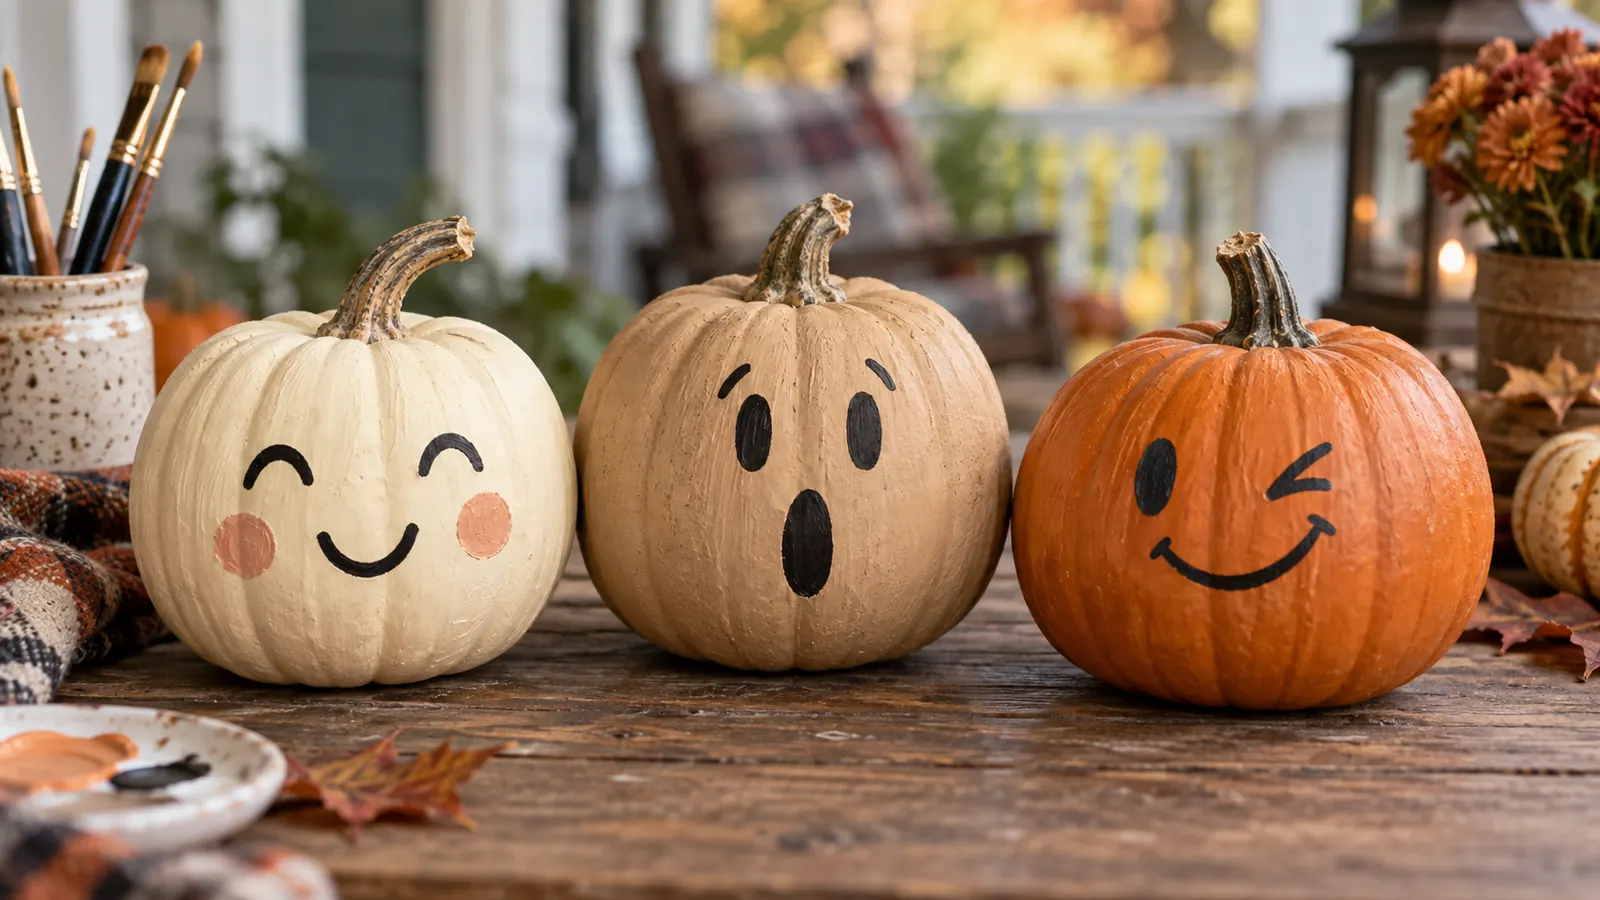
Start with three small pumpkins painted cream, tan and muted orange, then add one simple original face on each using only eyes, brows and a tiny mouth. The limited cream, tan, orange and charcoal palette keeps the finished pumpkin cohesive even when the brushwork remains visibly handmade.
For the clearest result, practice expressions on paper, then transfer only a few confident marks with a fine brush. Allow each layer to dry before adding fine details, and rotate the pumpkin on a folded towel instead of holding it by the stem.
Use water-based craft paint according to its label and work on a protected, ventilated surface. A real pumpkin should be clean and fully dry before painting; avoid sealing in moisture around the stem or base, and display it away from direct heat and prolonged rain.
How to paint it
- Wipe the pumpkin clean and let the surface dry completely.
- Apply the base and map the main design in cream, tan, orange and charcoal.
- Create the motif: practice expressions on paper, then transfer only a few confident marks with a fine brush.
- Let the paint cure, then place the pumpkin where the surface will stay dry and cool.
Best for: A coordinated trio for a shelf or apartment entry
17. Soft autumn plaid pumpkin
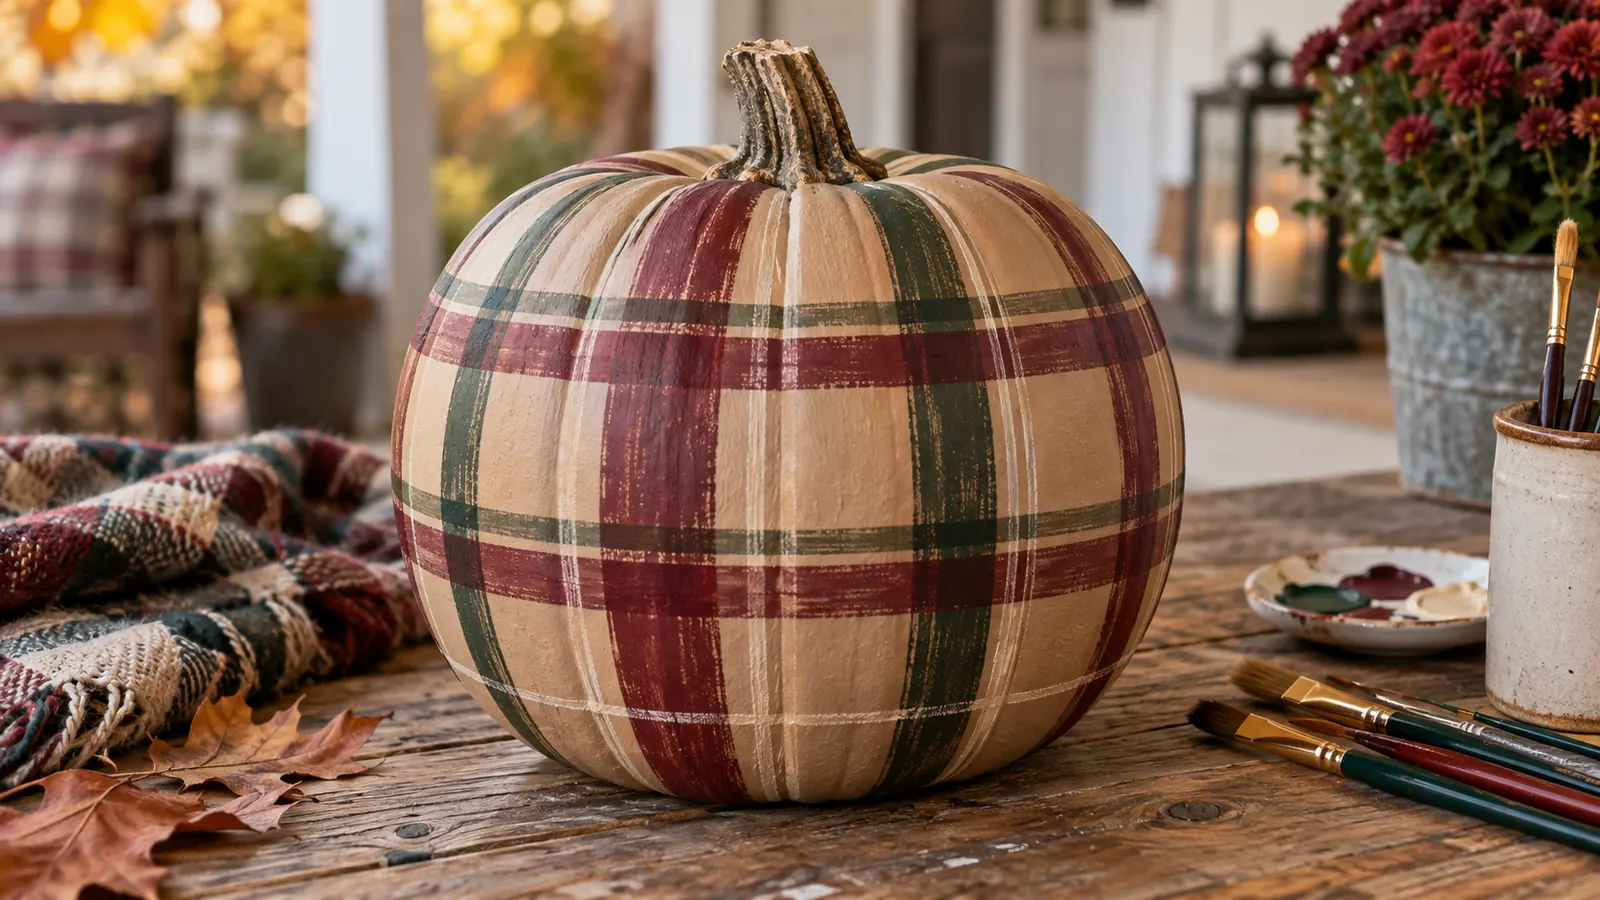
Start with a muted tan pumpkin, then add a loose woven plaid following the curve of the surface. The limited tan, burgundy, forest and cream palette keeps the finished pumpkin cohesive even when the brushwork remains visibly handmade.
For the clearest result, paint thin vertical lines first, let them dry and cross them with wider translucent horizontal bands. Allow each layer to dry before adding fine details, and rotate the pumpkin on a folded towel instead of holding it by the stem.
Use water-based craft paint according to its label and work on a protected, ventilated surface. A real pumpkin should be clean and fully dry before painting; avoid sealing in moisture around the stem or base, and display it away from direct heat and prolonged rain.
How to paint it
- Wipe the pumpkin clean and let the surface dry completely.
- Apply the base and map the main design in tan, burgundy, forest and cream.
- Create the motif: paint thin vertical lines first, let them dry and cross them with wider translucent horizontal bands.
- Let the paint cure, then place the pumpkin where the surface will stay dry and cool.
Best for: Traditional fall rooms, libraries and cozy porches
18. Night-garden pumpkin
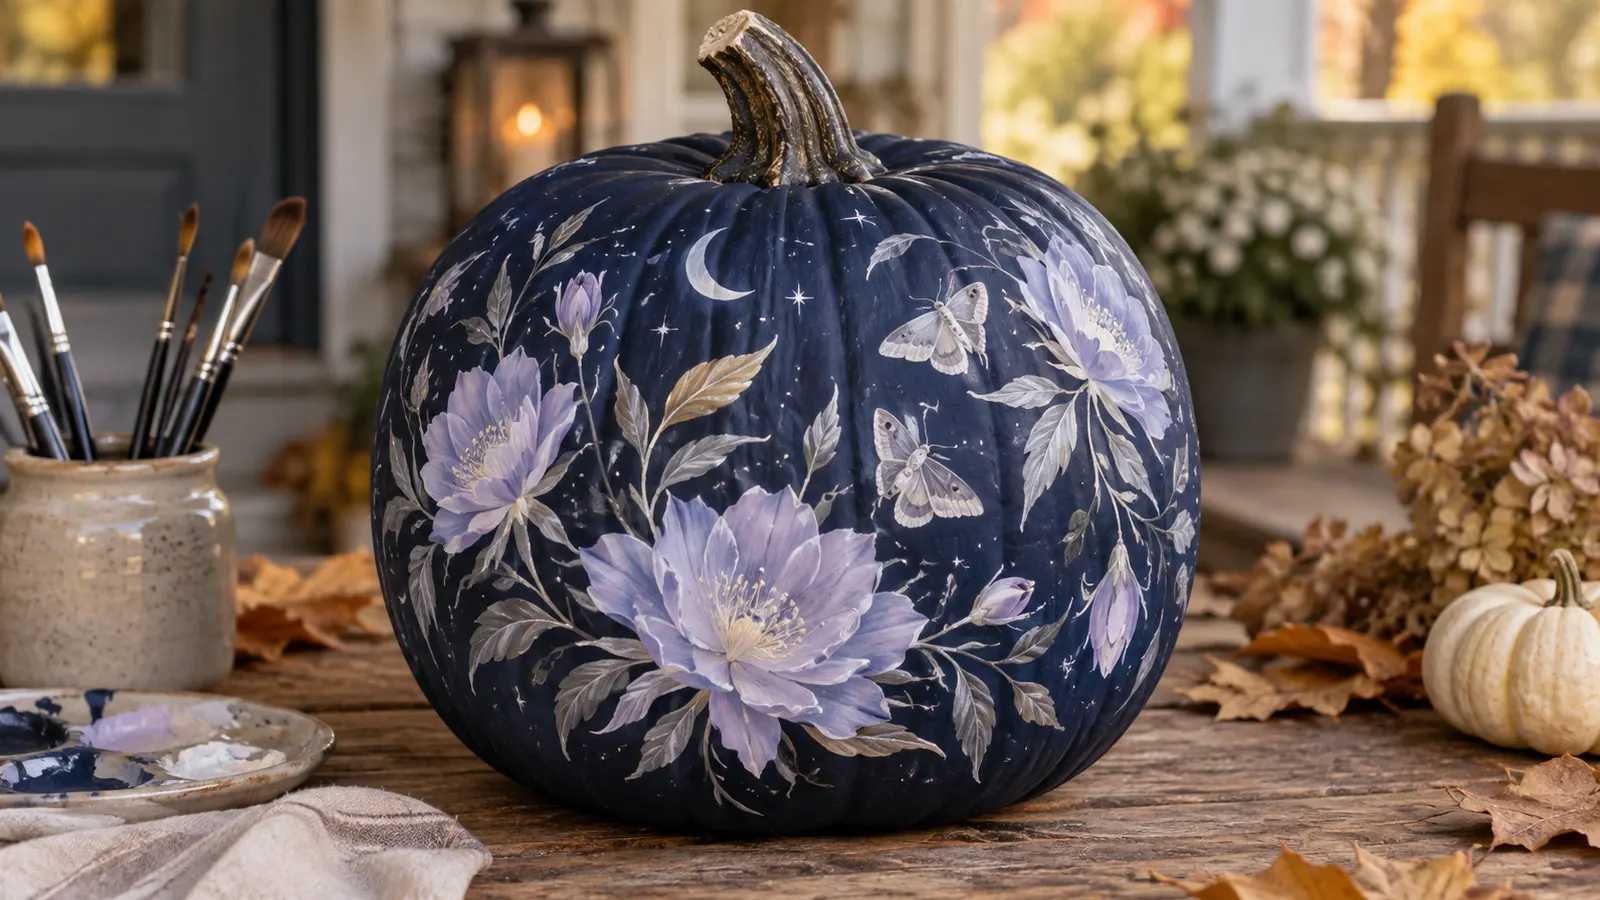
Start with a midnight-blue pumpkin, then add pale flowers that appear to open after dark with tiny moths and silver leaves. The limited midnight blue, pale lavender, silver and soft green palette keeps the finished pumpkin cohesive even when the brushwork remains visibly handmade.
For the clearest result, place the brightest flowers around one focal area and fade smaller buds toward the back. Allow each layer to dry before adding fine details, and rotate the pumpkin on a folded towel instead of holding it by the stem.
Use water-based craft paint according to its label and work on a protected, ventilated surface. A real pumpkin should be clean and fully dry before painting; avoid sealing in moisture around the stem or base, and display it away from direct heat and prolonged rain.
How to paint it
- Wipe the pumpkin clean and let the surface dry completely.
- Apply the base and map the main design in midnight blue, pale lavender, silver and soft green.
- Create the motif: place the brightest flowers around one focal area and fade smaller buds toward the back.
- Let the paint cure, then place the pumpkin where the surface will stay dry and cool.
Best for: A detailed statement pumpkin for indoor display
19. Terracotta sunburst pumpkin
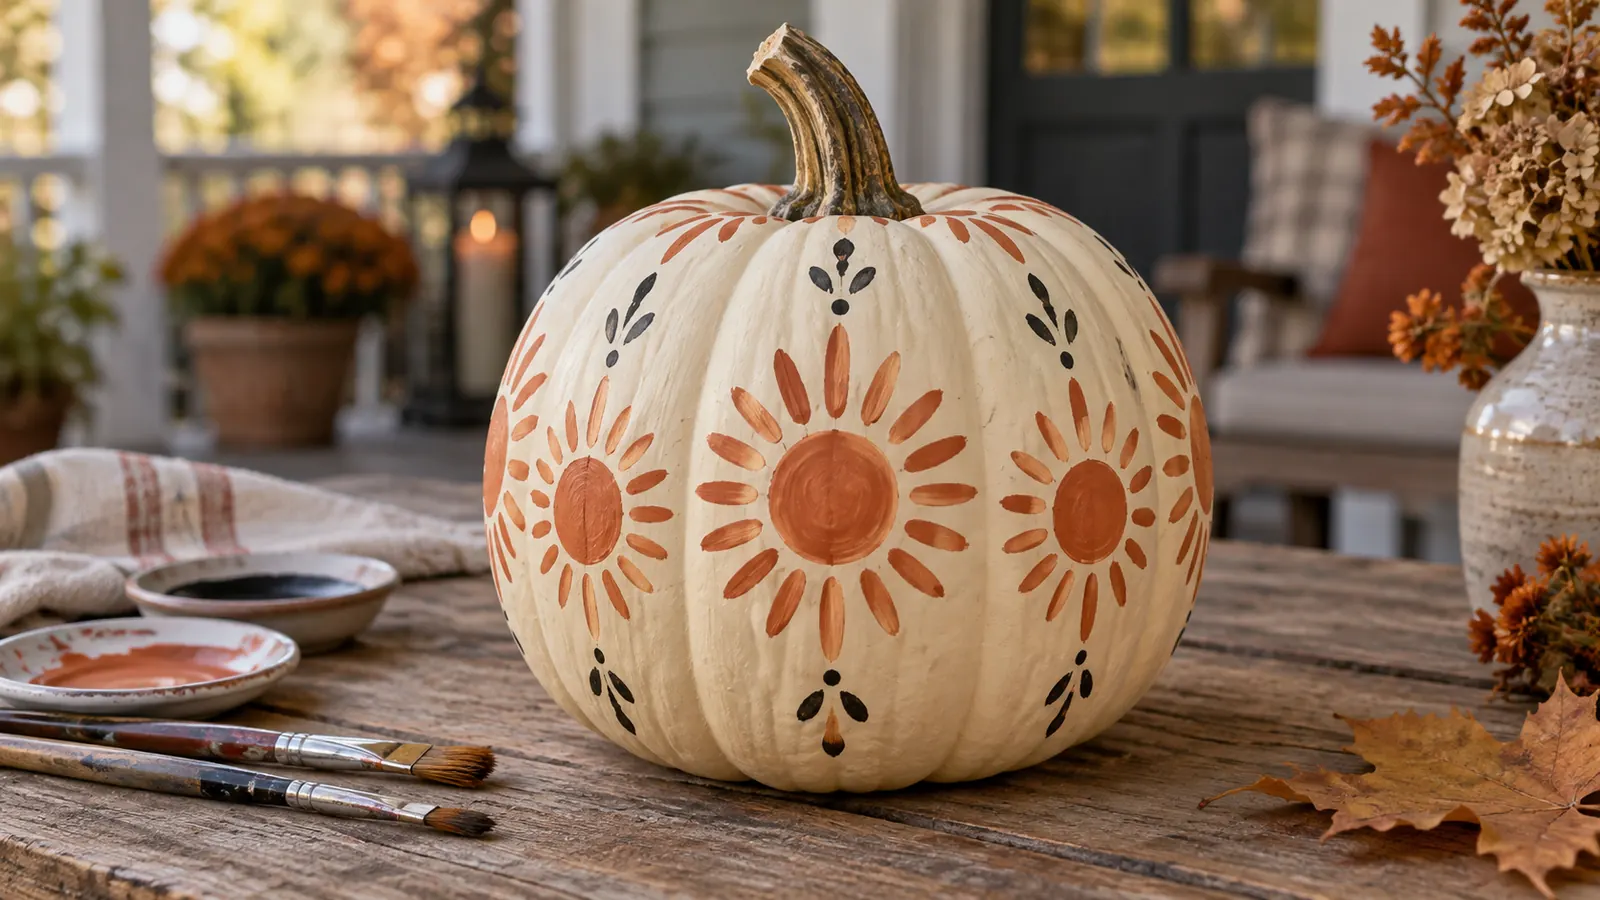
Start with a natural ivory pumpkin, then add repeated terracotta sunbursts centered on alternating ribs. The limited ivory, terracotta and muted black palette keeps the finished pumpkin cohesive even when the brushwork remains visibly handmade.
For the clearest result, mark each center dot, pull short rays outward and vary ray length to preserve a handmade character. Allow each layer to dry before adding fine details, and rotate the pumpkin on a folded towel instead of holding it by the stem.
Use water-based craft paint according to its label and work on a protected, ventilated surface. A real pumpkin should be clean and fully dry before painting; avoid sealing in moisture around the stem or base, and display it away from direct heat and prolonged rain.
How to paint it
- Wipe the pumpkin clean and let the surface dry completely.
- Apply the base and map the main design in ivory, terracotta and muted black.
- Create the motif: mark each center dot, pull short rays outward and vary ray length to preserve a handmade character.
- Let the paint cure, then place the pumpkin where the surface will stay dry and cool.
Best for: Bohemian and Southwestern-inspired autumn palettes
20. Copper drip pumpkin
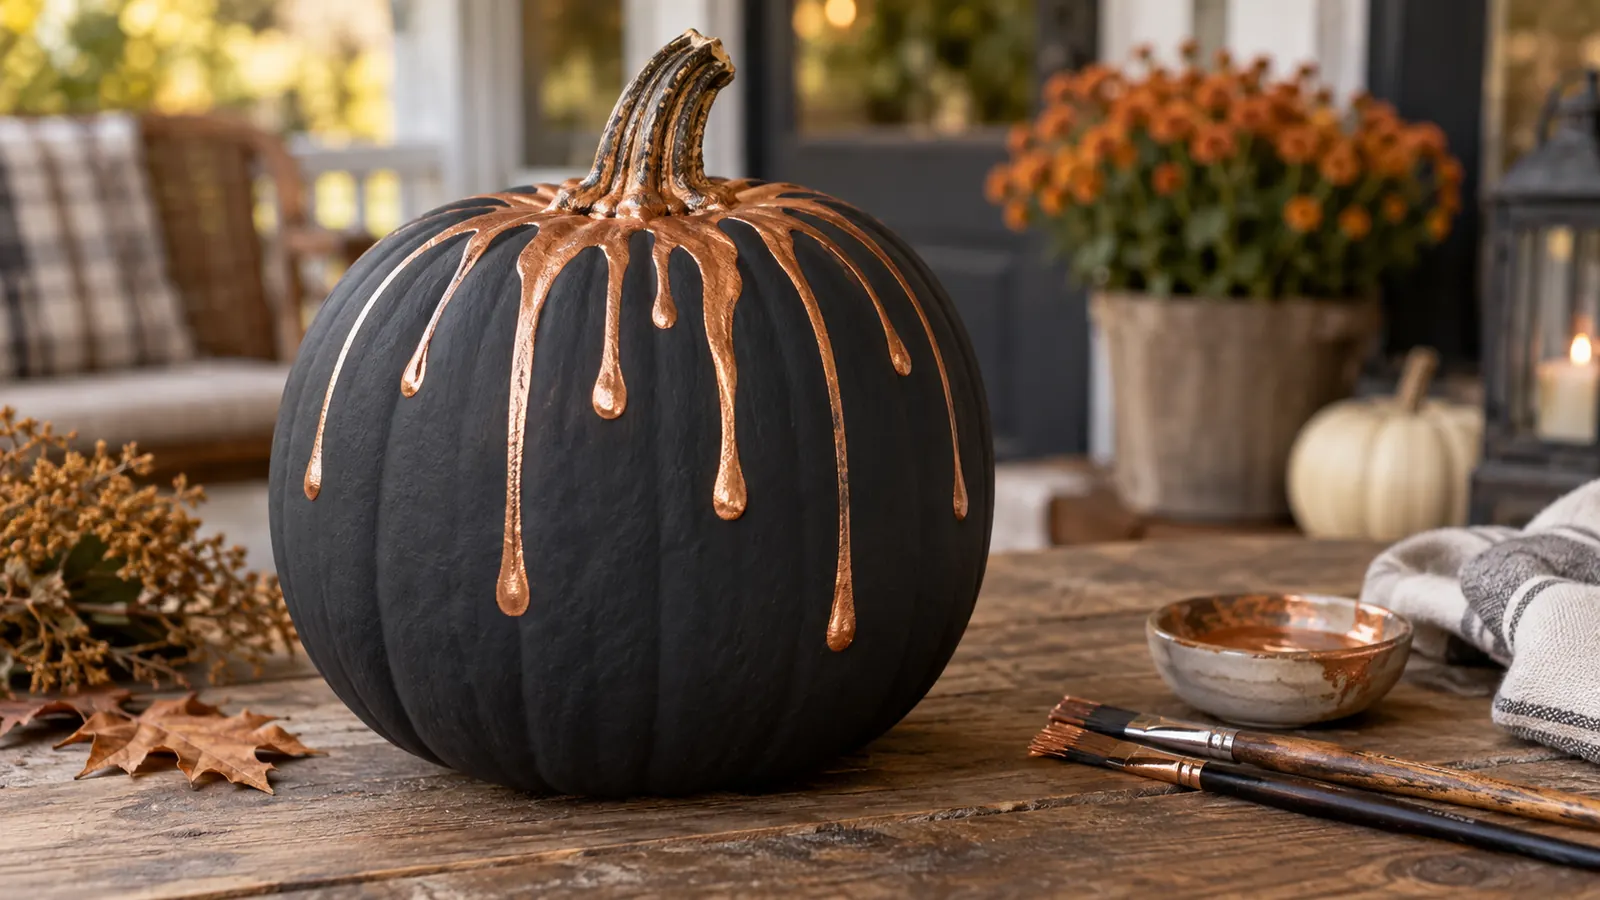
Start with a matte charcoal pumpkin, then add controlled metallic copper drips beginning around the stem. The limited charcoal and copper palette keeps the finished pumpkin cohesive even when the brushwork remains visibly handmade.
For the clearest result, paint an uneven copper ring at the top, draw several rounded drips downward and fill the shape rather than pouring wet paint. Allow each layer to dry before adding fine details, and rotate the pumpkin on a folded towel instead of holding it by the stem.
Use water-based craft paint according to its label and work on a protected, ventilated surface. A real pumpkin should be clean and fully dry before painting; avoid sealing in moisture around the stem or base, and display it away from direct heat and prolonged rain.
How to paint it
- Wipe the pumpkin clean and let the surface dry completely.
- Apply the base and map the main design in charcoal and copper.
- Create the motif: paint an uneven copper ring at the top, draw several rounded drips downward and fill the shape rather than pouring wet paint.
- Let the paint cure, then place the pumpkin where the surface will stay dry and cool.
Best for: A quick glamorous project with clean predictable results
21. Moonlit storybook village pumpkin
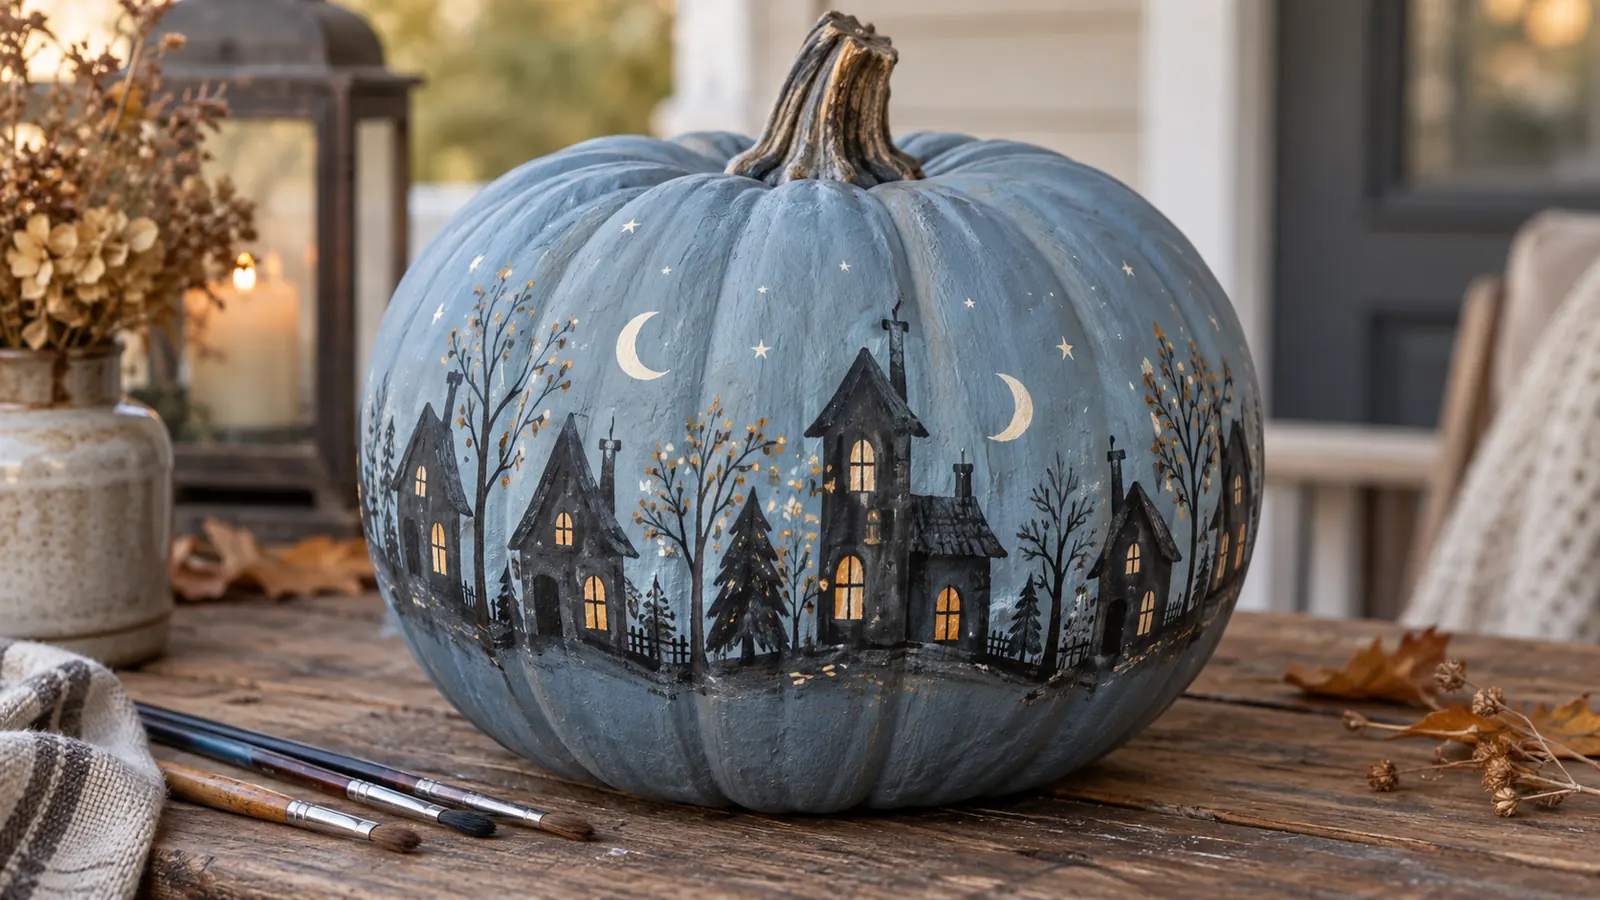
Start with a dusty blue pumpkin, then add an original ring of crooked little houses, trees and glowing-looking windows. The limited dusty blue, charcoal, cream and amber palette keeps the finished pumpkin cohesive even when the brushwork remains visibly handmade.
For the clearest result, paint a dark ground line around the widest point, add varied rooftops and finish with tiny amber window squares. Allow each layer to dry before adding fine details, and rotate the pumpkin on a folded towel instead of holding it by the stem.
Use water-based craft paint according to its label and work on a protected, ventilated surface. A real pumpkin should be clean and fully dry before painting; avoid sealing in moisture around the stem or base, and display it away from direct heat and prolonged rain.
How to paint it
- Wipe the pumpkin clean and let the surface dry completely.
- Apply the base and map the main design in dusty blue, charcoal, cream and amber.
- Create the motif: paint a dark ground line around the widest point, add varied rooftops and finish with tiny amber window squares.
- Let the paint cure, then place the pumpkin where the surface will stay dry and cool.
Best for: A centerpiece meant to be viewed from every side
22. Abstract brushstroke pumpkin
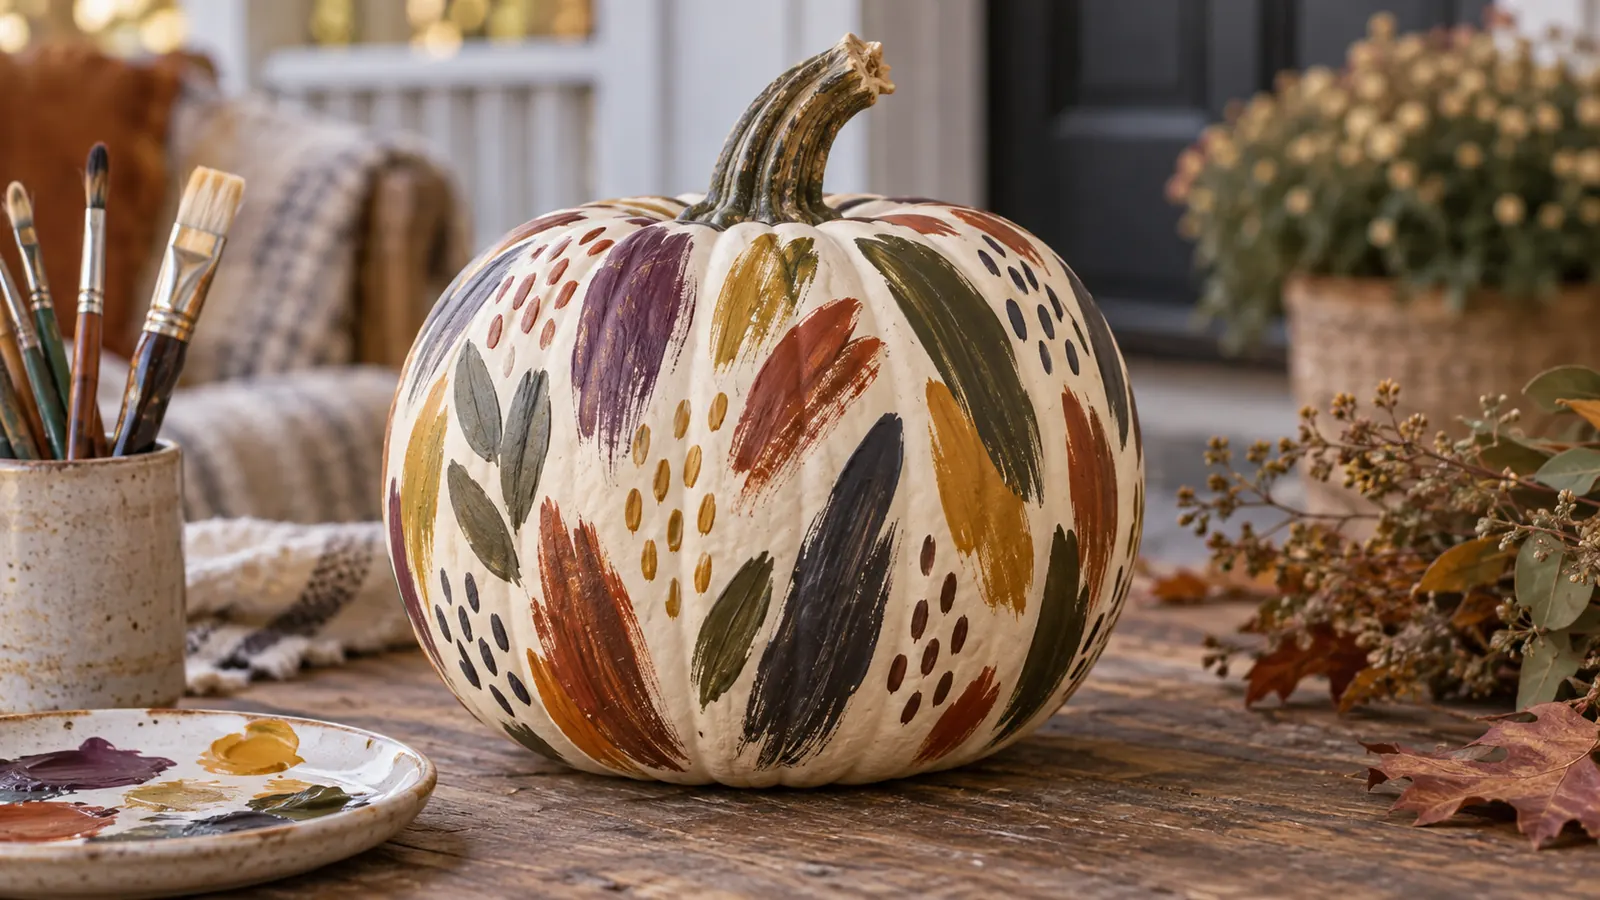
Start with a cream pumpkin, then add overlapping expressive strokes and dashes with visible bristle texture. The limited plum, moss, ochre, rust and charcoal palette keeps the finished pumpkin cohesive even when the brushwork remains visibly handmade.
For the clearest result, work from the largest pale strokes to the smallest dark accents, rotating the pumpkin between colors. Allow each layer to dry before adding fine details, and rotate the pumpkin on a folded towel instead of holding it by the stem.
Use water-based craft paint according to its label and work on a protected, ventilated surface. A real pumpkin should be clean and fully dry before painting; avoid sealing in moisture around the stem or base, and display it away from direct heat and prolonged rain.
How to paint it
- Wipe the pumpkin clean and let the surface dry completely.
- Apply the base and map the main design in plum, moss, ochre, rust and charcoal.
- Create the motif: work from the largest pale strokes to the smallest dark accents, rotating the pumpkin between colors.
- Let the paint cure, then place the pumpkin where the surface will stay dry and cool.
Best for: Using leftover paint and creating a one-of-a-kind modern piece
23. Painted lace pumpkin
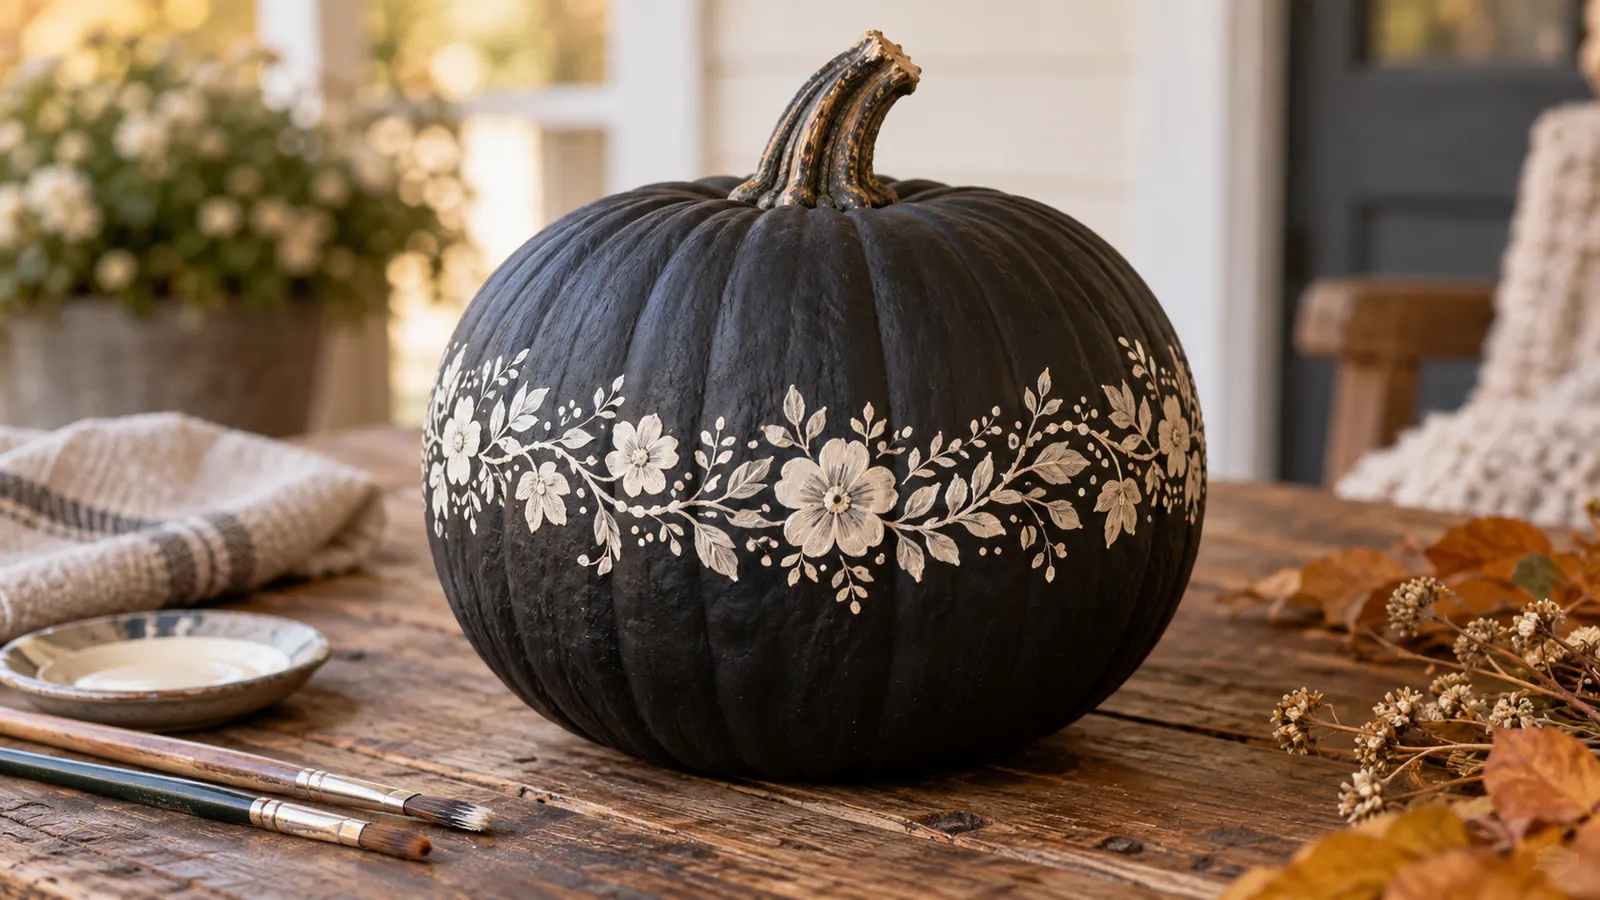
Start with a muted black pumpkin, then add a delicate ivory lace-like border around the center. The limited black and warm ivory palette keeps the finished pumpkin cohesive even when the brushwork remains visibly handmade.
For the clearest result, repeat one simple floral stencil section around the pumpkin and connect imperfect joins with small hand-painted dots. Allow each layer to dry before adding fine details, and rotate the pumpkin on a folded towel instead of holding it by the stem.
Use water-based craft paint according to its label and work on a protected, ventilated surface. A real pumpkin should be clean and fully dry before painting; avoid sealing in moisture around the stem or base, and display it away from direct heat and prolonged rain.
How to paint it
- Wipe the pumpkin clean and let the surface dry completely.
- Apply the base and map the main design in black and warm ivory.
- Create the motif: repeat one simple floral stencil section around the pumpkin and connect imperfect joins with small hand-painted dots.
- Let the paint cure, then place the pumpkin where the surface will stay dry and cool.
Best for: A formal monochrome tablescape
24. Botanical snake pumpkin
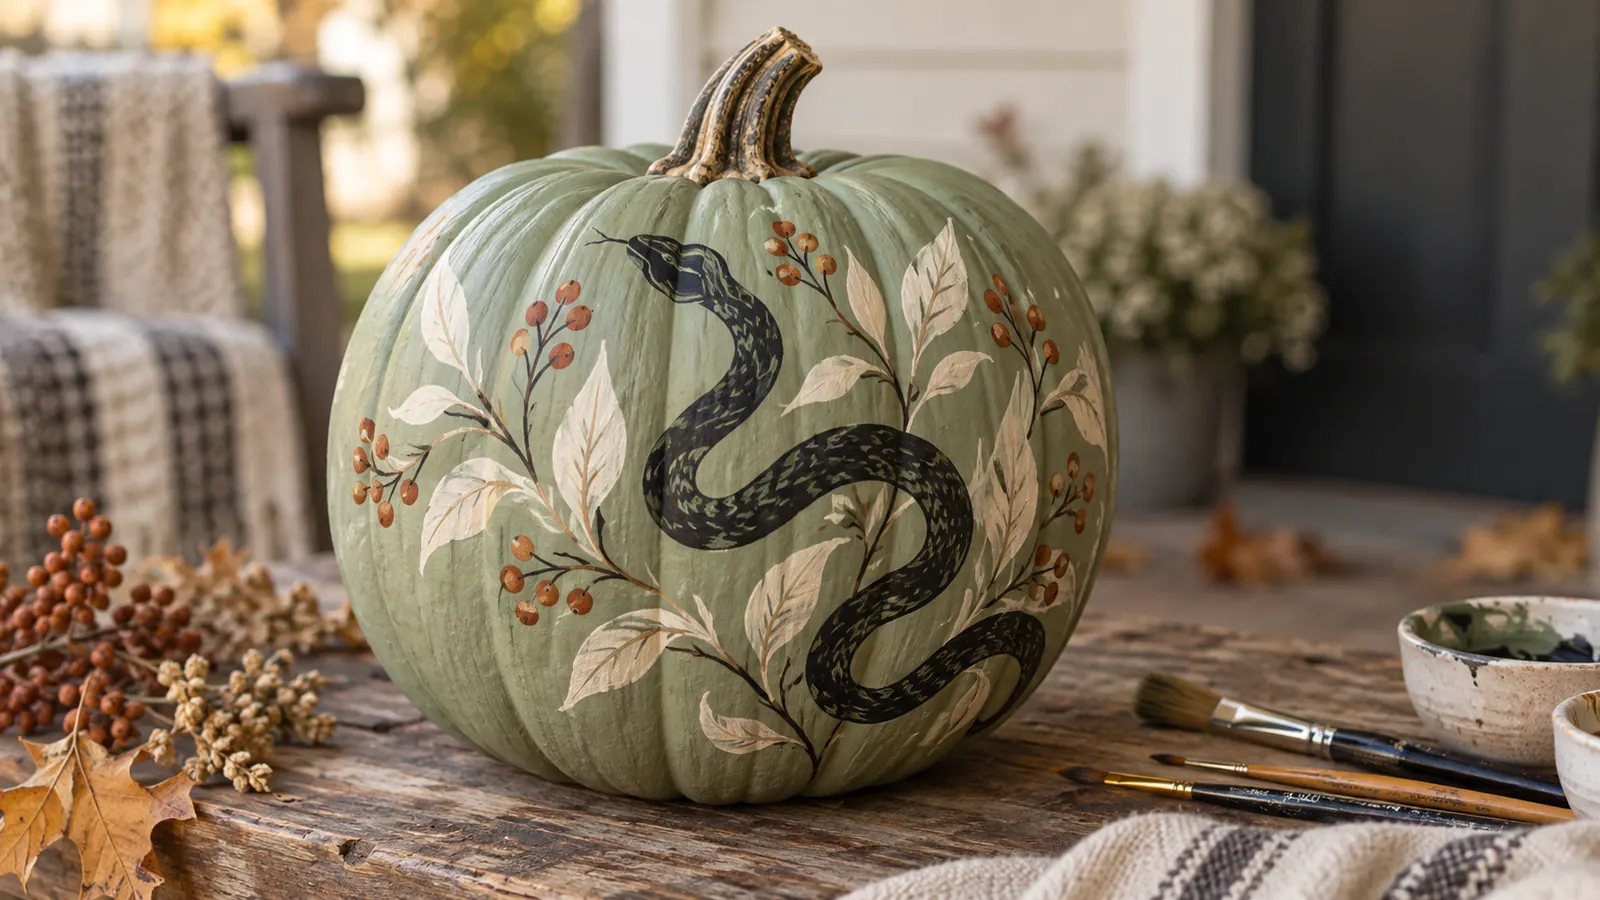
Start with a sage-green pumpkin, then add one elegant original black snake weaving between cream leaves and rust berries. The limited sage, black, cream and rust palette keeps the finished pumpkin cohesive even when the brushwork remains visibly handmade.
For the clearest result, draw the continuous snake curve first, thicken it gradually and place foliage around rather than over the body. Allow each layer to dry before adding fine details, and rotate the pumpkin on a folded towel instead of holding it by the stem.
Use water-based craft paint according to its label and work on a protected, ventilated surface. A real pumpkin should be clean and fully dry before painting; avoid sealing in moisture around the stem or base, and display it away from direct heat and prolonged rain.
How to paint it
- Wipe the pumpkin clean and let the surface dry completely.
- Apply the base and map the main design in sage, black, cream and rust.
- Create the motif: draw the continuous snake curve first, thicken it gradually and place foliage around rather than over the body.
- Let the paint cure, then place the pumpkin where the surface will stay dry and cool.
Best for: A slightly spooky botanical look without gore
25. Patchwork quilt pumpkin
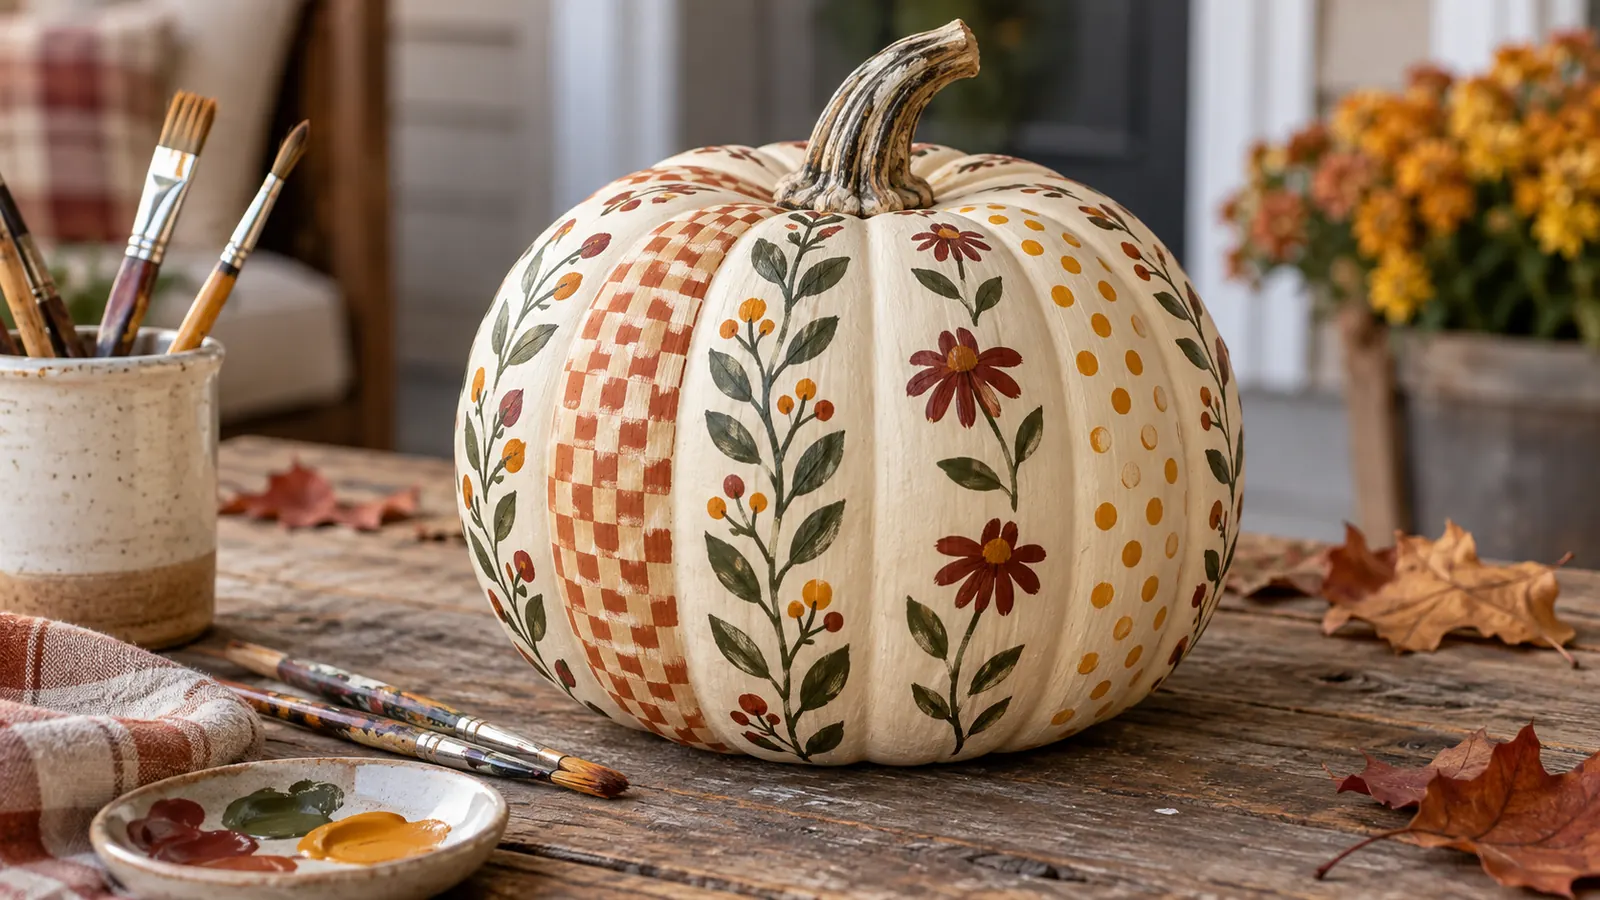
Start with an ivory pumpkin, then add different small folk patterns contained within the natural rib sections. The limited ivory, rust, denim blue, mustard and forest palette keeps the finished pumpkin cohesive even when the brushwork remains visibly handmade.
For the clearest result, treat every two ribs as a fabric panel and alternate checks, leaves, dots and simple flowers. Allow each layer to dry before adding fine details, and rotate the pumpkin on a folded towel instead of holding it by the stem.
Use water-based craft paint according to its label and work on a protected, ventilated surface. A real pumpkin should be clean and fully dry before painting; avoid sealing in moisture around the stem or base, and display it away from direct heat and prolonged rain.
How to paint it
- Wipe the pumpkin clean and let the surface dry completely.
- Apply the base and map the main design in ivory, rust, denim blue, mustard and forest.
- Create the motif: treat every two ribs as a fabric panel and alternate checks, leaves, dots and simple flowers.
- Let the paint cure, then place the pumpkin where the surface will stay dry and cool.
Best for: Crafters who enjoy detail and colorful traditional patterns
26. Painted dusk ombré pumpkin
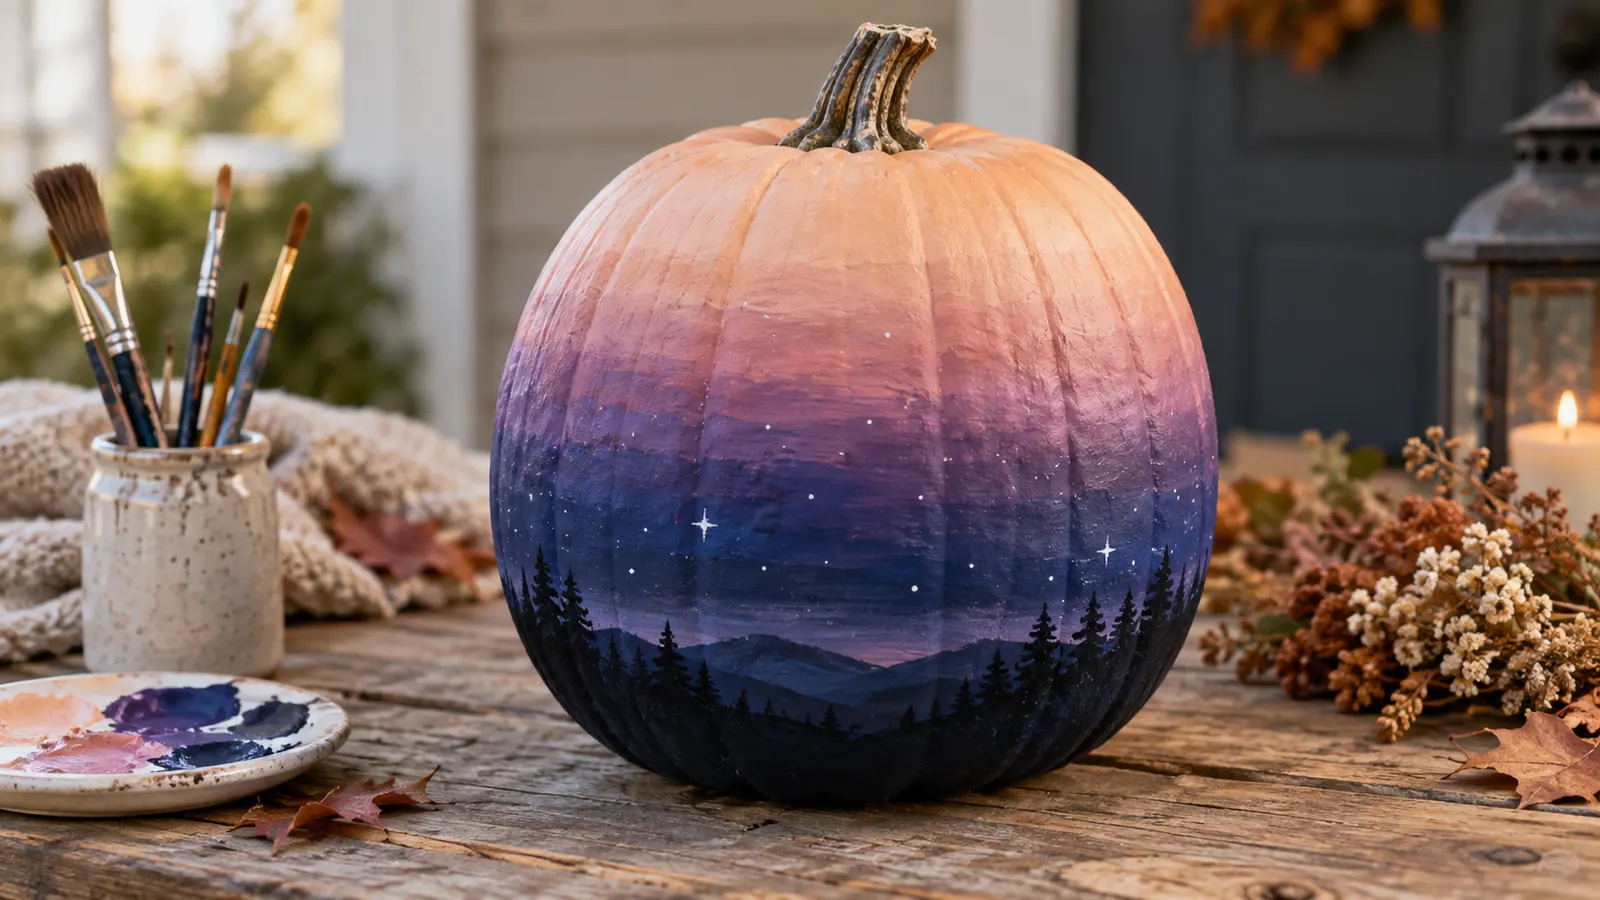
Start with a pumpkin primed in pale peach, then add a seamless-looking shift from warm peach through plum to midnight. The limited peach, mauve, plum and navy palette keeps the finished pumpkin cohesive even when the brushwork remains visibly handmade.
For the clearest result, blend neighboring colors while damp with separate clean brushes and finish with a few tiny stars after drying. Allow each layer to dry before adding fine details, and rotate the pumpkin on a folded towel instead of holding it by the stem.
Use water-based craft paint according to its label and work on a protected, ventilated surface. A real pumpkin should be clean and fully dry before painting; avoid sealing in moisture around the stem or base, and display it away from direct heat and prolonged rain.
How to paint it
- Wipe the pumpkin clean and let the surface dry completely.
- Apply the base and map the main design in peach, mauve, plum and navy.
- Create the motif: blend neighboring colors while damp with separate clean brushes and finish with a few tiny stars after drying.
- Let the paint cure, then place the pumpkin where the surface will stay dry and cool.
Best for: A simple design where color is the main feature
27. Tiny spiderweb pumpkin
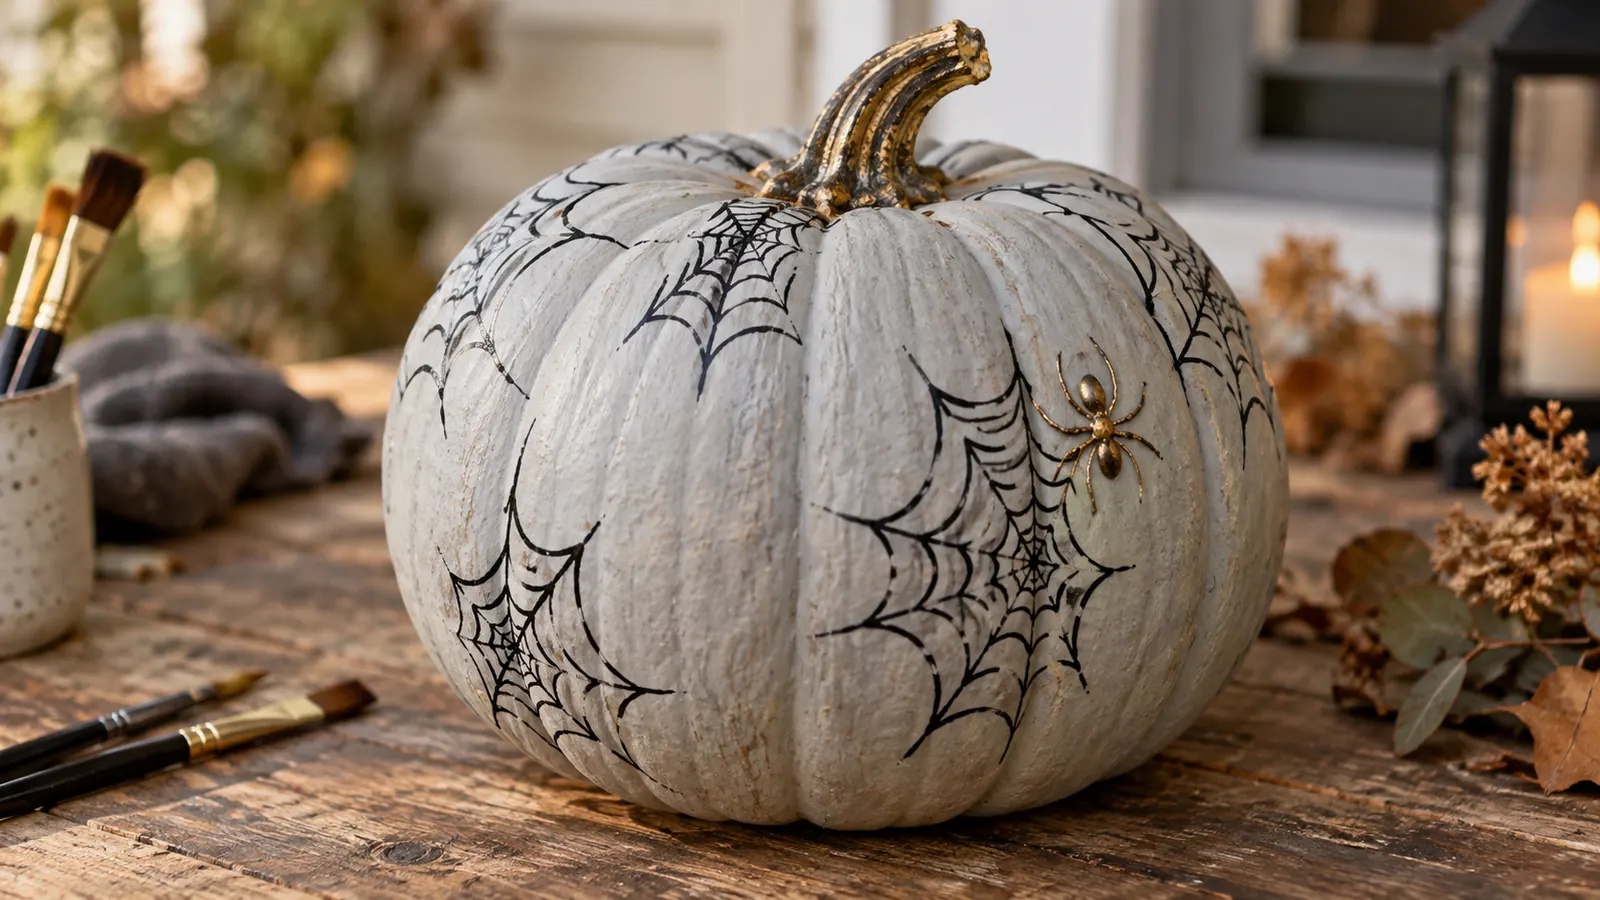
Start with a pale gray pumpkin, then add several small irregular black webs tucked into the grooves with one subtle gold spider. The limited gray, black and antique gold palette keeps the finished pumpkin cohesive even when the brushwork remains visibly handmade.
For the clearest result, paint three crossing lines for each web, connect them with loose curves and avoid making every web identical. Allow each layer to dry before adding fine details, and rotate the pumpkin on a folded towel instead of holding it by the stem.
Use water-based craft paint according to its label and work on a protected, ventilated surface. A real pumpkin should be clean and fully dry before painting; avoid sealing in moisture around the stem or base, and display it away from direct heat and prolonged rain.
How to paint it
- Wipe the pumpkin clean and let the surface dry completely.
- Apply the base and map the main design in gray, black and antique gold.
- Create the motif: paint three crossing lines for each web, connect them with loose curves and avoid making every web identical.
- Let the paint cure, then place the pumpkin where the surface will stay dry and cool.
Best for: A classic Halloween motif in a refined palette
28. Painted pressed-leaf pumpkin
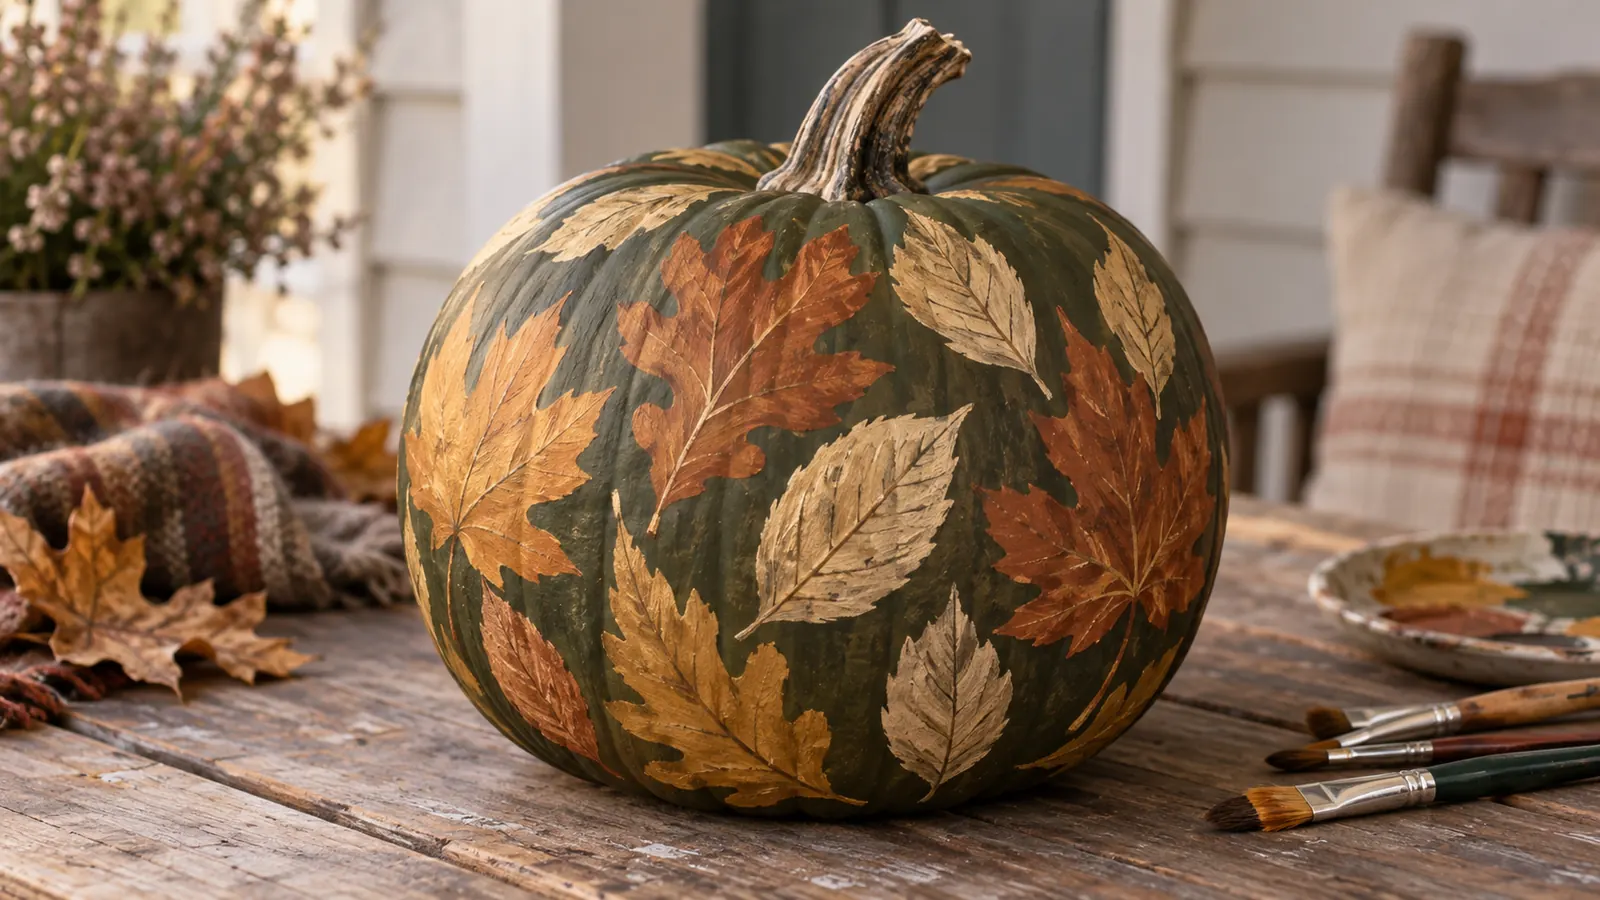
Start with a deep olive pumpkin, then add layered silhouettes that resemble scattered pressed autumn leaves. The limited olive, ochre, rust and parchment palette keeps the finished pumpkin cohesive even when the brushwork remains visibly handmade.
For the clearest result, use real clean leaves only as shape references, then hand-paint varied silhouettes to keep the surface dry and durable. Allow each layer to dry before adding fine details, and rotate the pumpkin on a folded towel instead of holding it by the stem.
Use water-based craft paint according to its label and work on a protected, ventilated surface. A real pumpkin should be clean and fully dry before painting; avoid sealing in moisture around the stem or base, and display it away from direct heat and prolonged rain.
How to paint it
- Wipe the pumpkin clean and let the surface dry completely.
- Apply the base and map the main design in olive, ochre, rust and parchment.
- Create the motif: use real clean leaves only as shape references, then hand-paint varied silhouettes to keep the surface dry and durable.
- Let the paint cure, then place the pumpkin where the surface will stay dry and cool.
Best for: Nature-inspired displays and imperfect pumpkins
29. Painted ribbon-bow pumpkin
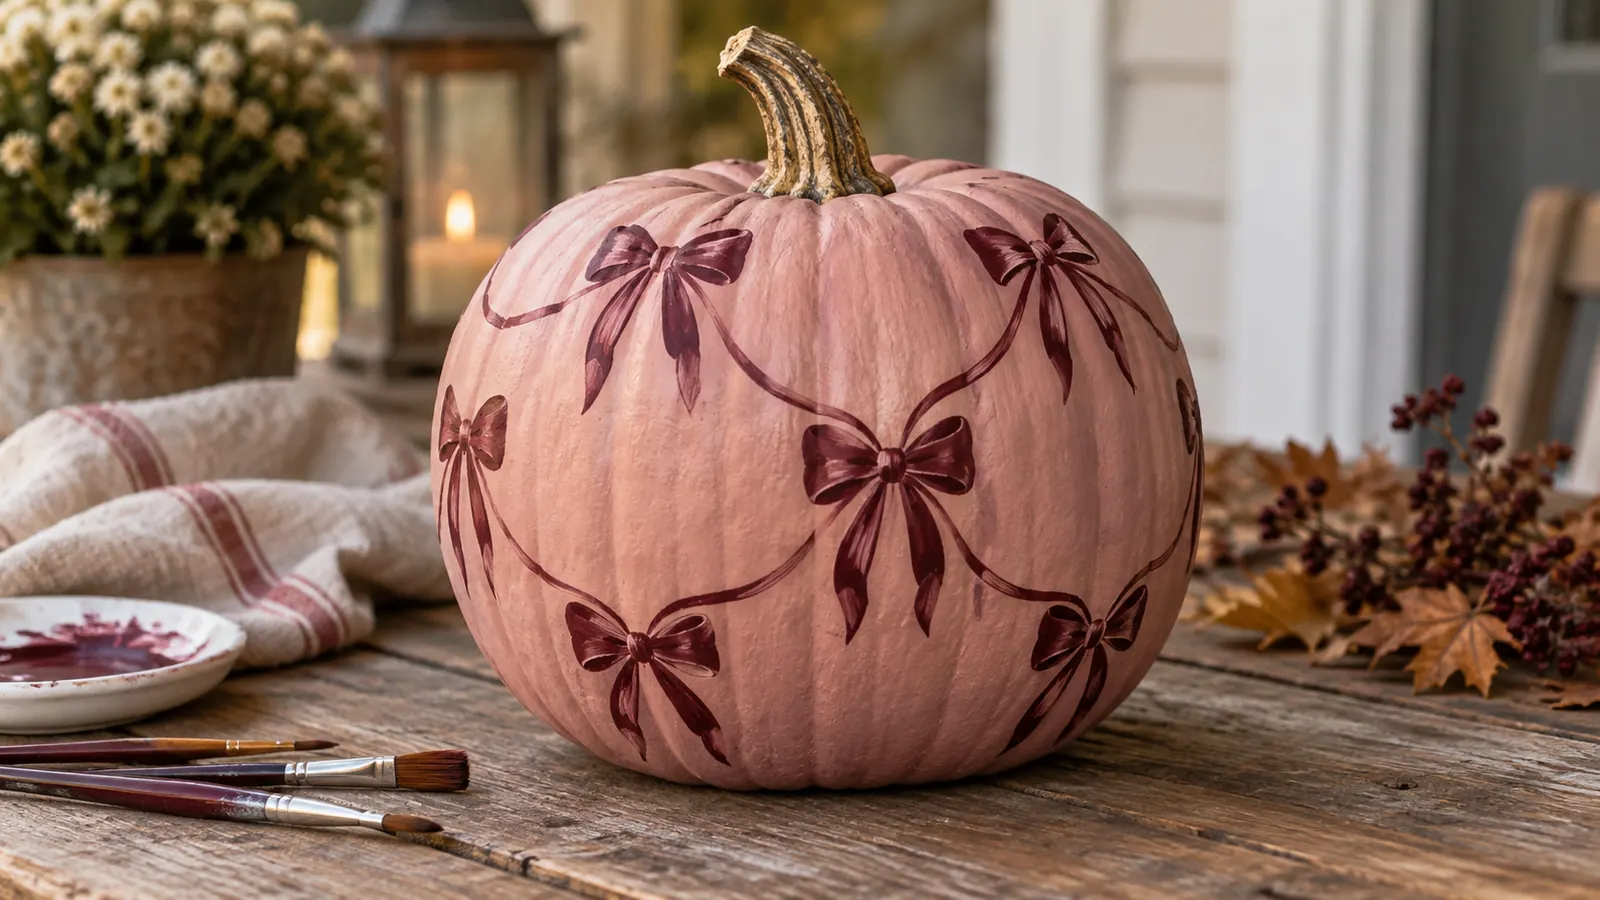
Start with a dusty rose pumpkin, then add small deep-burgundy bows connected by fine trailing ribbons. The limited dusty rose, burgundy and cream palette keeps the finished pumpkin cohesive even when the brushwork remains visibly handmade.
For the clearest result, paint each bow from two rounded triangles and a center knot, then add the ribbon lines with a liner brush. Allow each layer to dry before adding fine details, and rotate the pumpkin on a folded towel instead of holding it by the stem.
Use water-based craft paint according to its label and work on a protected, ventilated surface. A real pumpkin should be clean and fully dry before painting; avoid sealing in moisture around the stem or base, and display it away from direct heat and prolonged rain.
How to paint it
- Wipe the pumpkin clean and let the surface dry completely.
- Apply the base and map the main design in dusty rose, burgundy and cream.
- Create the motif: paint each bow from two rounded triangles and a center knot, then add the ribbon lines with a liner brush.
- Let the paint cure, then place the pumpkin where the surface will stay dry and cool.
Best for: A charming fashion-forward pumpkin display
30. Personal constellation pumpkin
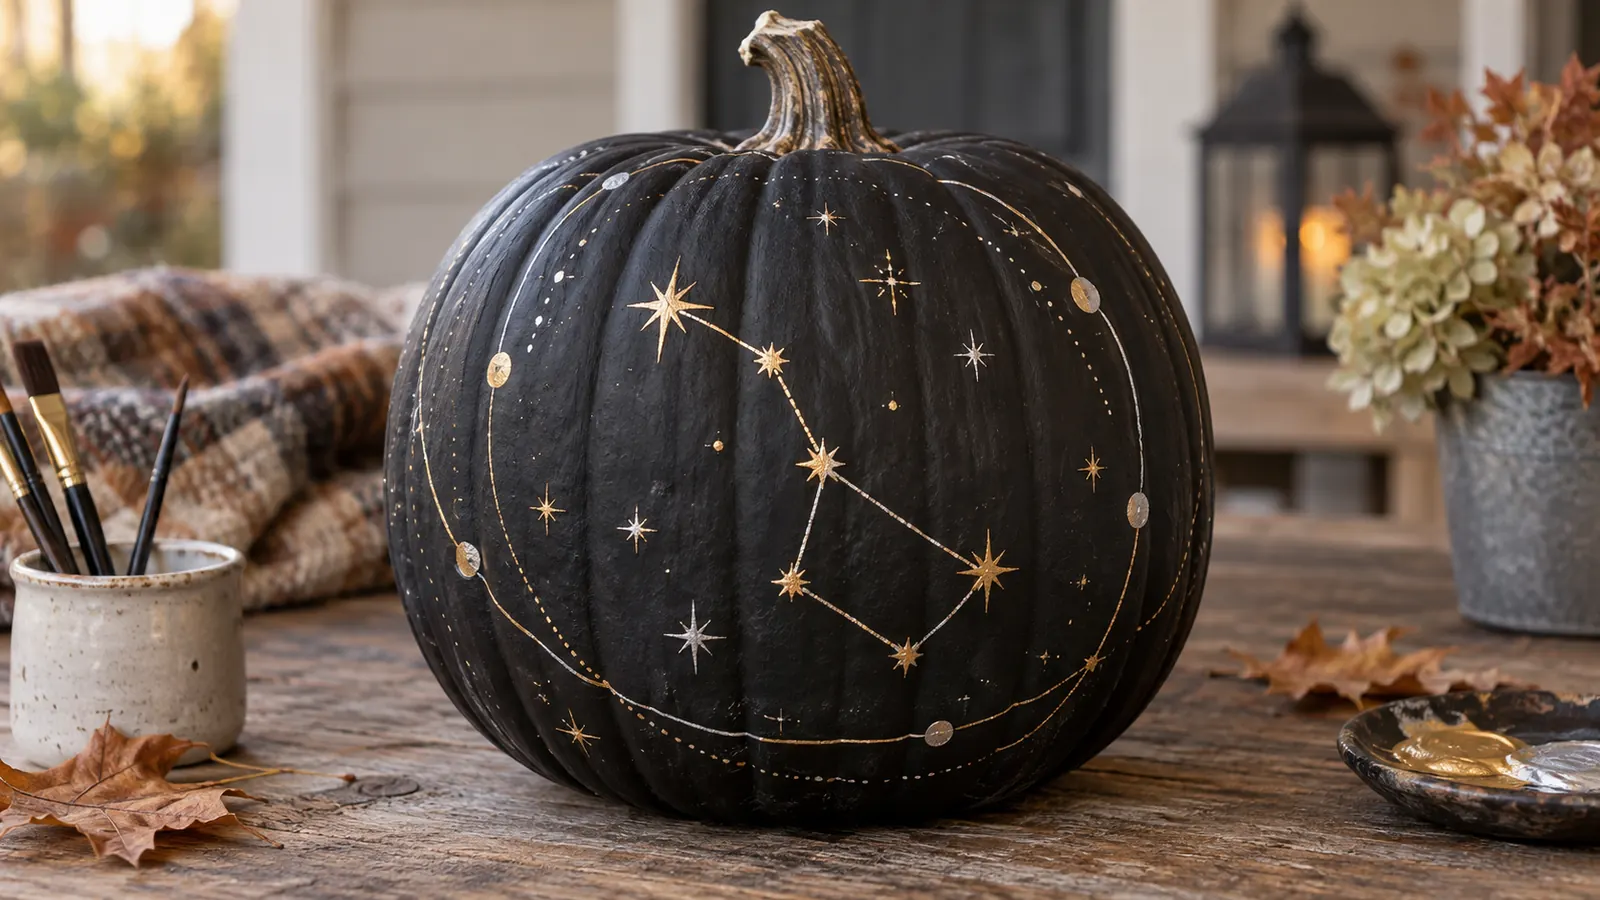
Start with a black pumpkin, then add one invented central constellation surrounded by a sparse star field and orbit lines. The limited black, silver and muted gold palette keeps the finished pumpkin cohesive even when the brushwork remains visibly handmade.
For the clearest result, plot the major stars with dots, connect only selected points and vary star size for depth. Allow each layer to dry before adding fine details, and rotate the pumpkin on a folded towel instead of holding it by the stem.
Use water-based craft paint according to its label and work on a protected, ventilated surface. A real pumpkin should be clean and fully dry before painting; avoid sealing in moisture around the stem or base, and display it away from direct heat and prolonged rain.
How to paint it
- Wipe the pumpkin clean and let the surface dry completely.
- Apply the base and map the main design in black, silver and muted gold.
- Create the motif: plot the major stars with dots, connect only selected points and vary star size for depth.
- Let the paint cure, then place the pumpkin where the surface will stay dry and cool.
Best for: A personalized celestial project without lettering
Frequently asked questions
What kind of paint works on pumpkins?
Water-based acrylic craft paint is commonly used for decorative pumpkins because it dries quickly and offers strong color. Follow the product label, use thin coats and test a small area if the pumpkin has been treated or waxed.
How do I help paint stick to a real pumpkin?
Choose a firm pumpkin, remove surface soil gently and let it dry completely. Avoid oily cleaners, thick wet coats and painting over moisture. Handle the finished pumpkin from the base rather than the stem.
Do painted pumpkins last longer than carved pumpkins?
Not cutting the skin generally avoids the rapid drying and exposed interior associated with carving, but a painted pumpkin is still fresh produce. Heat, freezing, moisture, bruising and existing soft spots can shorten its display life.
What painted pumpkin ideas are easiest for beginners?
Color-block waves, scalloped stripes, a loose checkerboard, tiny ghosts, sunbursts and a controlled metallic drip design use large shapes and need fewer fine brush skills.
Can painted pumpkins stay outside?
They can be displayed in a sheltered dry location when the paint label permits it. Prolonged rain, direct sun and temperature extremes can damage both the finish and the pumpkin, so bring detailed pieces inside during poor weather.
Anna reviewed the article for clarity, image relevance, realistic expectations and alignment with the Lively Edit editorial policy. Safety and health claims are checked against appropriate authoritative sources; the updated date changes only after a meaningful review.
Read our editorial process →The images in this story were created with AI as original editorial visuals and reviewed to ensure that each image is relevant to the accompanying guidance.